
User Manual


HDMI to AV Cable User Manual
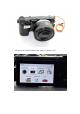
--Set the HDMI resolution of the camera to “Auto”
--Set the Drive Mode of the camera to “Remote Cdr.”
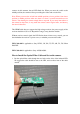
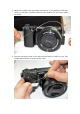
--Install the HDMI module to the camera; connect the shutter control wire with the
receiver
--Install the optical fiber cable to the convert module, and paste the other ends of the
optical fiber cable outside of the camera infrared receiver window.
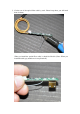
If the users want to control taking photos and recording video, you need to use a 3
position switch on the radio, and connect the shutter cable to the corresponding
channel on the receiver.
If users could not connect the shutter cable to the receiver, this module could not
control the camera to take photo or record video.
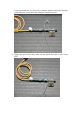
Note: When you install the optical fiber cable, please cut the cable by sharp knife to
guarantee the smooth of the end face, increase the translucency.
The 3 position switch on the radio:
1. Upper position-----take picture
2. Middle position-----Blank
3. Lower position----record video
Note: Before you turn the camera on or power the receiver, the position of this switch
should be in middle position, this is very important.
When the shutter control switch is in middle position, the red LED is on.
Take Picture Control
When you move the shutter control switch to upper position from middle postion, the
camera begin to take pictures continuously. At this moment, the red LED light flash
two times every second. If you want to stop taking photos, just move the switch to
middle position.
Record Video Control
When you move the shutter control switch to lower position from middle position, the
camera begin to record video, and the video saved on your memory card on the