
Manual


3
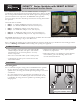
Unpacking the Sprinkler
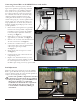
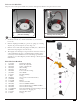
1
Remove the retaining screw.
2
Lift the cover.
3
Remove accessory kit.
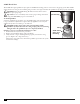
Waterproof Wire Splices
!
CAUTION: All wire splices and eld connections must be made using an appropriate method to protect the
connection from water contamination. Silicone gel and grease lled wire connectors are typically not suitable for
applications where the splice is continuously submerged in water. For these applications Toro recommends a 3M
Scotchcast or equivalent connector that uses a hardening epoxy to waterproof the connection. e silicone gel caps
provided with this product provide excellent protection against water contamination when installed correctly and
not subjected to a continuously submerged environment.
is document provides instructions for the proper use of the silicone gel cap wire splices included.
If other splices are used, please follow the splice manufacturer’s installation instructions.
e silicone gel cap splices provided are for use inside the compartment connecting a maximum of three wires:
installing or replacing a GDC / LSM using two (2) #14 communication cable wires plus one (1) #16 wire from the GDC /
LSM or replacing the solenoid with two (2) #18 wires.
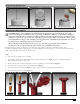
Steps
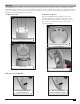
1. Strip wires (12-16 gauge) 7/16” (11 mm)
2. Pre-twisting is unneccessary. Hold stripped wires together with ends even (Figure 1). Lead stranded wires slightly.
Align any frayed strands or conductors.
3. Firmly push wire into connector and screw connector clockwise onto wire until tight (Figure 1).
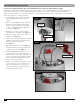
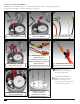
4. Insert the splice to the bottom of the sealant lled tube (Figure 2).
5. Position wires into wire channels (Figure 3). Wipe away any sealant around opening and conductors.
6. Close lid ensuring latch is secured (Figure 4).
Figure 1
Figure 2
Figure 3
Figure 4