
Installation Guide

14W, 20W & 26W
WALLPACK LIGHT
SUITABLE FOR WATTAGES:
4.20’’ x 6.22’’ x 7.21’’
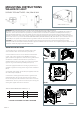
FIGURE 4
FIGURE 1 FIGURE 2
FIGURE 3
W
VER01.16
MOUNTING INSTRUCTIONS
MOUNTING INSTRUCTIONS:
1. Loosen Allen screw on side of xture and adjust angle to gain
access to back box door. Screws will remain in place (FIG. 1)
2. Unscrew side xture screw to remove door from back box. Refer
to (FIG. 3-W). Conrm junction box size PRIOR to removing the
gasket material for the application. ONLY remove the gasket material
needed for the installation. Mount back box to junction box via
supplied hardware or lag mount. Utilize any junction box pairings for
lag mount. Lag mount hardware provided by others (FIG. 3)
3. Knock out appropriate Slots when mounting to junction box (not
supplied) or lag bolt to mounting surface using location noted below
(FIG. 4)
4. Feed supply wires through Junction Box (not supplied). Check that
the Gasket is fully sealed (FIG. 4)
5. Secure door in lock hinges located at the left or right of the box
just like illumination. (FIG. 2) Loosen four front screws in order to
connect with the junction box. All electrical connections must remain
inside back box. Secure any lose wires to harness prior to closing and
securing door. Tighten door screw to seal xture
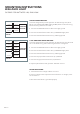
A-A 4’’ SQUARE BOX E-E 4’’ ROUND BOX
B-B 4’’ OCTAGONAL BOX F-F 2
3
/4 HOLE PATTERN
C-C 3 ½ SQUARE/OCTAGON BOX G-G SINGLE GANG
D-D MASONRY BOX
JUNCTION BOX MOUNTING GUIDE: (FIG. 3)
FIXTURE IS SUITABLE FOR WET LOCATION
CAUTION: For proper weatherproof function all gaskets must be seated properly and all screws inserted and tightened rmly. Apply
weatherproof silicone sealant (NOT included) around the edge of the Wall Box and/or Junction Box. This is especially important with an uneven
wall surface. Silicone all plugs and unused conduit entries.
IMPORTANT: READ BEFORE REMOVING FIXTURE FROM CARTON. RETAIN FOR FUTURE REFERENCE.
This xture must be wired and installed in accordance with the NATIONAL ELECTRIAL CODE and all state and applicable local codes and
ordinances. These codes and ordinances supersede any and all instruction contained herein. Installation should be performed only by a
licensed and bonded electrician and a person familiar with the construction and operation of the product and the hazards involved in the
installation and operation of this product. Proper grounding is required for safety. Make certain power is OFF before installing or maintaining
xture. Failure to do so may increase the RISK OF PERSONAL INJURY, PROPERTY DAMAGE, FIRE, AND DEATH. The manufacturer takes no
responsibility for the product not installed under those guidelines and those contained in this document. See wiring diagram on back