
Installation Guide
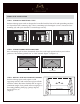
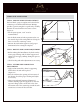

STEP 6 (CONTINUED)
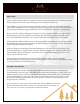
A) For the apron option, apply small beads of
silicone adhesive around the top edge of the sink.
(Figure 6.2)
Place and align the countertop on top of the sink. •
With a rubber mallet gently tap the countertop in
place.
Some silicone adhesive may squeeze out around •
the sink edges. Promptly clean up any excess by
following the instruction on the sealant’s label.
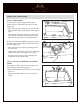
B) For the ush mount and built-up mount options,
DO NOT apply silicone adhesive around the top of
the sink. (Figure 6.3)
Place and align the countertop opening around •
the sink edges.
Apply silicone adhesive in between the countertop •
and the sink edges. Fill any gaps as necessary.
Promptly clean up any excess by following the •
instruction on the sealant’s label.
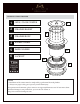
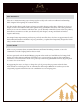
STEP 7 - INSTALL PLUMBING AND CHECK
LEAKS
Once ample of time is given for the sealant to cure,
install garbage disposal, drain pipe, etc.
Run a small amount of water rst to check for leaks. •
(Figure 7)
Make proper adjustments or repairs if leaks are •
found.
N o !
Figure 6.3
Figure 6.2
Figure 7
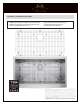
APRON SINK APPLICATION