
Installation Guide
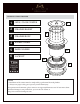
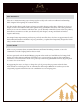

STEP 6 - SET THE SINK AND INSTALL
COUNTERTOP
Apply sealant around the cabinet’s supporting •
frame where the sink will be placed.
(Figure 6.1)
Place the sink into the opening or front cutout of •
the cabinet. Check for proper leveling and adjust
as necessary.
Using a rag and small amount of denatured •
alcohol (cleaning agent not supplied) to clean the
top rim or ange surface of the sink. Also clean
the bottom side of the countertop around the sink
cutout area to remove all dust and dirt.
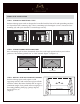
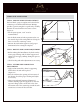
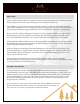
STEP 4 CREATE TEMPLATE AND CUTOUT
For best nish, a proper template and cutout for the
countertop is recommended. Exclusive Heritage
provides a generic template as a guide only, carefully
measure the actual sink for an accurate cut out.
(Figure 4)
For the apron option, a 1/4” reveal is •
recommended.
For the ush mount or built-up mount styles, use •
the outside edges of the sink prole for tracing the
lines to create the countertop cutout.
Measure the sink outline again to verify proper •
dimensions before cutting the template.
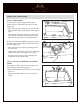
STEP 5 DRY FIT SINK & MAKE ADJUSTMENT
Before making nal installation, dry t the sink to •
ensure proper tting with the frame support and
cabinet. Do not apply caulking during this process.
(Figure 5)
Check leveling and make adjustments as necessary.•
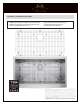
CUTTING
TEMPLATE
CUTTING
TEMPLATE
Figure 4
Figure 6.1
Figure 5
APRON SINK APPLICATION