
Installation Guide

Terrazzo(/(Marble:(
(
Level!all!grout!lines!with!an!appropriate!cement<based!patch!reinforced!with!polymers.!
!
Hard(Surfaces:!
!
Tiles!must!be!well!secured!to!the!floor!or!removed.!Broken,!damaged,!or!loose!tiles!must!be!
replaced.!
!
Job(Layout:((
!
!!!!!!!!! !
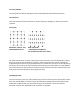
Monolithic,(Quarter(Turn,( Brick(and(Ashlar(
And(MultiEDirectional((((((( **Brick/Ashlar(Installations(
( ( ( ( use(aproximately(35%(more(clips**((
(
!!
!!
No!matter!which!layout!is!chosen,!carpet!clips!can!be!used.!Once!you!have!found!your!starting!
place,!square!lines!must!be!drawn!on!the!floor.!The!first!clip!must!be!turned!on!a!45!degree!
angle!starting!dead!center!of!your!perpendicular!lines.!Follow!the!score!lines!on!the!clip!to!keep!
tile!square!on!the!clip.!On!all!the!lines!being!used!to!keep!your!modular!floor!true,!the!adhesive!
on!the!back!of!the!tile!clips!must!be!used!to!secure!the!trueness!of!the!floor.!Note!that!the!main!
body!of!the!install!has!the!option!of!using!peel!and!stick.!
!
!
Installing(the(Tiles:((
!
To!secure!the!tiles!to!the!clips,!place!all!adjoining!corners!of!the!tiles!on!the!clip!and!press!down!
with!your!thumb.!Make!sure!the!pins!have!penetrated!the!backing!fully!and!then!tap!the!tiles!
down!with!a!rubber!mallet!until!pressed!flush!with!the!metal!plate.!!Once!this!has!been!
achieved,!continue!with!application!until!installation!is!complete.!
!