
Full Product Manual


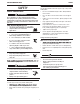


Table Of Contents

A-2
INSTALLATION
PORTABLE WELDING TABLE ASSEMBLY
Parts needed
• A (x 1)
• C (x 1)
• N (x 4)
Step 1
On FLAT surface, place table top Part C’s threaded studs through
Part A’s tabbed slot hole. Lightly fasten with nuts (N). Do not
tighten.
FIGURE A.1
PORTABLE WELDING TABLE
Parts needed
• B (x 1)
• D (x 1)
• N (x 4)
Step 2
Repeat step (1) with top part B and D.
FIGURE A.2
Parts needed
• E (x 1)
• N (x 6)
Step 3
Slide bracket (E) onto assembly from Step 1. Lightly fasten nuts.
FIGURE A.3
Parts needed
• N (x 6)
Step 4
Slide assembly from Step 2 into bracket (E). Lightly fasten nuts.
FIGURE A.4