
Full Product Manual

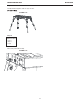
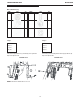
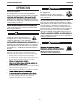
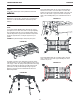
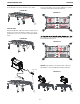
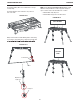
Table Of Contents

A-4
INSTALLATION
Parts needed
• J (x 1)
• G (x 6)
• H (x 4)
Step 9
Repeat step 8 with remaining three leg components.
PORTABLE WELDING TABLE
Parts needed
• Leg Assembly
(x 1)
• N (x 3)
Step 10
Align leg bracket bolt holes so legs pivot along long sides
of table. Mount table leg assembly onto table with carriage
bolts (O) and lock nuts (N). In the remaining circular hole,
fasten with self-tapping bolt (P). Tighten nuts to 50-56
in-lbs.
FIGURE A.9
• L (x 4)
• M (x 4)
• O (x 3)
• P (x 1)
Parts needed
• Leg Assembly
(x 3)
• N (x 9)
Step 11
Repeat step 10 with remaining three legs of table.
FIGURE A.10
• O (x 9)
• P (x 3)
Parts needed
• U (x 1)
• R (x 2)
Step 12
Fasten carrying handle onto long side of the table, or to short
side for use with optional wheel kit. Tighten bolts until handle
is secure.
FIGURE A.11
• S (x 2)
• Q (x 2)