
Full Product Manual


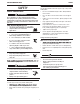


Table Of Contents

A-3
INSTALLATION
Parts needed
• F (x 1)
• N (x 6)
• O (x 4)
Step 5
On inner side of table, slide in side bracket (F) into threaded
studs. Lightly fasten with lock nuts (N). Insert carriage bolts
(O) through bracket and bottom lip of table top. Lightly fasten
with nuts (N).
FIGURE A.5
PORTABLE WELDING TABLE
Parts needed
• F (x 3)
• N (x 18)
• O (x 12)
Step 6
Repeat Step 5 with remaining three sides of table top.
FIGURE A.6
Step 7
Gradually tighten all nuts to 50-56 in-lbs. Table top now complete.
FIGURE A.7
Parts needed
• K (x 1)
• G (x 1)
• L (x 1)
Step 8
FIGURE A.8
• M (x 1)
NOTE: DO NOT OVERTIGHTEN DEFORMING THE LEG
TUBE.
Assemble leg component. Fasten with bolt (M) and nut (L).