
Instructions / Assembly


R H
•••••••••••••••••••••••••••••••••••••••••
INSTALLATION INSTRUCTIONS
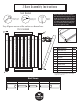
HANGER HOLES
Assembling Your Door
Assembly Instructions
We recommend a dry assembly. It is
recommended you not use glue or
adhesive of any kind.
1.
2.
3.
4.
5.
B1
B2 B2 B2 B2 B2 B2 B3
Lay out A1L, A2, A3 And A1R with the grooves
facing inward. B1’s tongue faces right. All B2 slats
will have their grooves to the left and tongues to
the right. B3’s groove will face to the left.
A3
A1
L
A1
R
A2
Once all the (B) slats are together in position,
slide A2 to the right and up to cover the bot-
toms of the B Slats. Gently tap slats into place
with a rubber mallet.
A2
A3
A3
A1
L
Slide Slat A3 down to cover the tops of all
B slats. Gently tap slats into place with a
rubber mallet.
Slide Slat A1 L to the right so it’s groove
covers the tongues in A2 and A3 as well
as the left edge of Slat B1. Gently tap
slats into place with a rubber mallet.
Gently tap stiles into place with a rubber
mallet. Now you will fasten everything
together with the Lag Bolts, making sure
they are going into the stiles straight.
PLEASE NOTE: ese instructions
are specic to a particular door size and
type. Adjustments may be needed on
your part for changes in specications
and measurements, as well as door types
that are dierent than these.
Z Barn Assembly Instructions
A1
L
A1
L
A1
R
A1
R
A1
R
A1
R