
Installation Guide


Make the Wires Ready to Go
The thermostat should be connected to the proper power source and to a breaker
protection with appropriate electrical wire. Leave about 30cm (12”) so it can be
connected later.
Installing the Film
1. Inspect and Test the Product
Since it is very difficult to remove the product after installation, it is
CRITICALLY important to verify the resistance measurements for each
product and to record the readings on the system checklist.
Verify the product to see if they are in operable condition prior to installation. After
removing the product from its box, check its resistance using an ohm meter and record
the information. If the resistance reading varies greatly from the readings on each film,
do not install the film and call your supplier for assistance in product replacement.
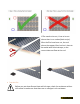
2. Prepare a Stable installation area
It is important to install the film ONLY after the installation area is
completely clean and stable. Applying the film on an unstable floor can
result in damage to the film and will void warranty.
Make sure the jobsite is clean and dust-free before handling Dream Heat. Dust will
weaken the tape’s adhesion, which is going to be holding down the film. Any sharp
debris can damage the product.
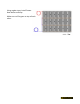
3. Place the Dream Heat in the Designated Area
The warranty is void if there is any cut in the black strip of the film. It will
also be void if the cut and finishing with electrical tape is not done as
described.
For effortless installation, locate where the thermostat is. Try out different positions and
angles with Dream Heat to make the process of connecting wires easy.