
Installation Guide


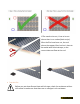

After the film is installed, locate the thermostat sensor. Place the sensor about 1m in
Dream Heat, between the panels. The sensor should be taped to the designated
installation place using a small piece of tape.
7. Connect the Wires and Run a Test
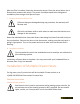
If Dream Heat gets damaged during any procedure, the warranty will
become void.
Check the resistance with an ohm meter to make sure that there are no
changes in the resistance.
Route the individual wires from each Dream Heat along the base of the wall and up to
the junction box. Connect the wires to the thermostat, making sure that each wire is
going in right places. Turn on the power and test to make sure that Dream Heat is
working.
8. Complete Installation
Flooring materials used in the installation must be rated for use with electric
floor warming systems.
Installation of Dream Heat is complete. You may now install your hardwood floor or
laminate floor. Enjoy the warmth!
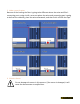
Installation of Multiple Dream Heats
For big areas, use of junction box will be inevitable. Please contact us at
1 (844) 436-4328 toll free number for extra help.
Electrical Instruction
Additional Power Modules
Each branch circuit used in conjunction with a heating system must be, for
the exclusive use of the heating system by NEC, specified. Do not connect
lights, outlets, etc. to any branch circuit used with Dream Heat.