Contents Materials.................................................................................................................................................................. 3 Electrical Instruction.................................................................................................................................................4 Thermostat Location.............................................................................................................................................
Installation of this heating product shall be in accordance with manufacturer’s instructions and regulations of the authority having jurisdiction. Installation of this heating product shall be in accordance with article 424 Section IX of the National Electrical Code, ANSI/NFPA 70. Heating elements should not be installed at or below 32 °F (0 °C). Before installation, ensure that the electrical capacity is sufficient for the total output of this film. Jobsite must be clean before Dream Heat gets installed.
Floor primer Tools: Digital ohm meter, wire stripper, knife Installation of One Dream Heat Electrical Instruction Thermostat Location A thermostat must be used on all installations and must contain a ground fault circuit interrupter (UL Listed, Class A type). The thermostat should be installed about 1.5m (4.92’) above the wall on an inside wall, making sure that it is easily accessible and reachable.
Sensor Installation The sensor wire should be installed inside of the conduit together with other wires, or outside of it, having a separate hole for dividing purposes as required by the electrical code. Temporarily tape the sensor to subfloor or elsewhere safe so it can be located approximately 1m away from the wall for later installation procedures.
Make the Wires Ready to Go The thermostat should be connected to the proper power source and to a breaker protection with appropriate electrical wire. Leave about 30cm (12”) so it can be connected later. Installing the Film 1. Inspect and Test the Product Since it is very difficult to remove the product after installation, it is CRITICALLY important to verify the resistance measurements for each product and to record the readings on the system checklist.
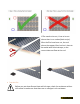
If film needs to be cut, it has to be cut where there is no carbon (black strips). After the film have been cut, the end where the copper/silver bus bar is have to be sealed with electrical tape, so the current does not flow at the end. 4. Tape the film Before you put down Dream Heat with the tape, check the resistance with an ohm meter to make sure that there are no changes in the resistance.
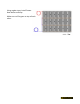
Using regular tape, install Dream Heat above underlay. Make sure no film goes on top of each other.
5. Make a room for wires Because of the leveling the floor is going to be different where the wires and film’s connecting parts, using a knife, carve out where the wires and connecting part is going to be from the underlay, place the wires afterwards, and then finish off with the tape. 6. Place the Sensor Do not damage the sensor in this process. If the sensor is damaged, it will cause the thermometer to malfunction.
After the film is installed, locate the thermostat sensor. Place the sensor about 1m in Dream Heat, between the panels. The sensor should be taped to the designated installation place using a small piece of tape. 7. Connect the Wires and Run a Test If Dream Heat gets damaged during any procedure, the warranty will become void. Check the resistance with an ohm meter to make sure that there are no changes in the resistance.
In addition to electrical instruction for a single Dream Heat installation instruction, if more than 3 sets of Dream Heat are getting installed, it may require an installation of a power module. Junction box Install the junction box as per installation instruction provided with the junction box purchased. It must be installed on an inside wall so that the readings are accurate. Install a 4x4 inch junction box for making electrical connections between the mats and thermostat.
After installing everything up to the sensor, begin the installation following the installation instructions for one Dream Heat until #7. Additional Tests Depending on the thickness of the concrete slab Dream Heat was installed on, there is a possibility of heat registering after a few hours or even a few days. In that case, just depend on the electrical tests.
Make sure that the breaker is off when working with any electrical wiring or touching any connections of it to avoid electrocution. Turn on the breaker and adjust the thermostat to heat 1 STEP HEAT up. Refer to the installation sheet provided with the thermostat to control to proper setting. After waiting few minutes, put your hand on Dream Heat and feel the warmth. You should be able to feel a comfortable warmth on your hand.
Placing Stickers Apply caution stickers provided in appropriate areas indicated below. Warning Affix to the electrical panel box. In the space provided, record the numbers of all circuits to which Dream Heat sets are attached. Caution Affix adjacent to points of access to all concealed areas in which installed heating products are accessible. GD Logo Affix to all devices controlling radiant heat (Thermostat, switch, etc.).
Heat product meanwhile. Warranty registration can be filled at our homepage: www.geodreamheat.com under Warranty Registration menu. Troubleshooting Problem Solution Thermostat GFCI If the thermostat trips and will not reset, check the following: the system MUST be on a dedicated branch circuit separate from any other electrical devices which could overload the circuit or create interferences resulting in the GFCI to trip.
Limited Warranty Geo Dream Heating Inc. warranties for a period of 15 years from the date of sale, which the product is free of manufacturing defects under normal usage conditions strictly followed by these installation instructions. If Dream Heat was installed or used in areas that was not specified in the installation instruction, the warranty is void. If Dream Heat is modified or damaged by the customer or any other external environment within the customer's power of reach, the warranty is void.