
Instructions / Assembly

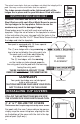


SCREW HOLE LOCATION GUIDE
Refer to the "Construction Close-ups" at the
beginning of these Instructions as indicated
below:
16x10
OVAL
18x12
OVAL
24x12
OVAL
24x15
OVAL
30x15
OVAL
33x18
OVAL
39x18
OVAL
45x18
OVAL
FIG. C
7" Ledge/ 6" Vertical
E & C E & C E & C E & C E & C E & C E & C E & C
FIG. A, B, D,
E, F, & G
6” Ext. & 7" Ledge/
6" Box Vertical
A & D A & D A & D A & D A & D A & D A & D A & D
FIG. H
9" & 10” Ledge/
8" Box Vertical
A & D A & D A & D A & D A & D A & D A & D A & D
25
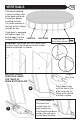
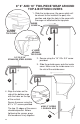
INSTALLING LEDGES
AND PLACEMENT OF WARNING LABELS
17
1
2
2
B
E
A
D
C
CDE
B
A
A
1
2
A
CB
E
D
B
EDC
A
A
A
A
C
C
B B
B
B
B
B
C
C
A
A
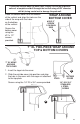
47 1/2” STRAIGHT
SIDE LEDGES
STANDARD
LEDGES
TRANSITION
LEDGE
TRANSITION
LEDGE
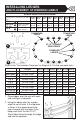
Refer to the "Construction Close-ups" on Pages 6 & 7 to find your pool style:
LEDGES 18 x 12 24 x 12 24 x 15 30 x 15 33 x 18 45 x 18
All Pools A Straight Side Ledges 47 1/2" 47 1/2" 47 1/2" 47 1/2" 47 1/2" 47 1/2"
Resin Pools B Standard Ledges 44 1/2" 44 1/2" 55 7/8" 55 7/8" 55 7/8" 55 7/8"
Resin Pools C Transition Ledges 33 3/8" 45 3/8" 33 3/8" 45 3/8" 45 3/8" 45 3/8"
Fig. A B Standard Ledges 43 3/4" 43 3/4" 55 1/4" 55 1/4" 55 1/4" 55 1/4"
Fig. A C Transition Ledges 33 3/8" 45 3/8" 33 3/8" 45 3/8" 45 3/8" 45 3/8"
Fig. E, G B Standard Ledges 46" 46" 57 3/4" 57 3/4" 57 3/4" 57 3/4"
Fig. E, G C Transition Ledges 32 3/4" 44 3/4" 32 3/4" 44 3/4" 44 3/4" 44 3/4"
Fig. B,C,F,H B Standard Ledges 44 1/4" 44 1/4" 55 5/8" 55 5/8" 55 5/8" 55 5/8"
Fig. B,C,F,H C Transition Ledges 33 3/8" 45 3/8" 33 3/8" 45 3/8" 45 3/8" 45 3/8"
1 - Place ledges over the wall with each
end resting on a top plate.
2 - Using the above chart as a guide
align the set of holes in the top plate
a shown in the above drawing for
your size pool with the holes in the
ledge and insert the No.12x1/2"
Sheet Metal Screw through the ledge
and into the top plate.