
Instructions / Assembly


19
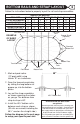
EARTH MOUND
12
2
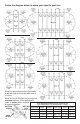
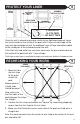
If you have a STANDARD SIZE SKIMMER, only remove the inside section
of the cutout, and place duct tape around the remaining scored sections as
shown in figure 2.
SMALL
STANDARD
SKIMMER
CUT INSIDE
AREA ONLY
On inside of wall, tape over
holes and slots that will not
be used with duct tape or
any other cloth tape.
If the through wall filter inlet and outlet holes are to be used, remove metal
cutouts by breaking perforations using a knife and hammer as shown.
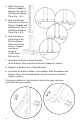
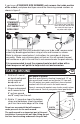
Refer to skimmer manufacturer's instructions for remainder of skimmer
assembly. Make sure skimmer does not leak as this will corrode the pool
wall and cause a split in the wall that is not covered under the pool warranty.
It is recommended to coat the exposed metal on both sides with a
clear lacquer or nail polish to help resist rust and corrosion.
3
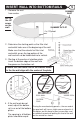
Wall guard is optional.
Tape wall guard (plastic sheeting) to pool wall 12" up
from ground and smooth out on ground 12" from wall.
This will protect your pools metal parts from chemical
reactions with the soil used in the earth mound.
Several commercial products can also be used in place
of earth mound. Consult your professional pool dealer.
1 - Build earth mound
on top of wall guard
using screened
damp earth or
pre-washed sand.
2 - Shape and compact
earth mound to run
8" up from ground
and 8" away from the wall.
3 - Build a ½” mound on top of the bottom
straps and hold down sheets to protect
your liner from metal edges of the strap.
Do not use any material that will compress
under pressure for the earth mound.
The earth mound is an important part of the pool
installation. It prevents the wall from lifting up and
the liner from sneaking underneath the pool wall.
EARTH
MOUND
8”
8”
OPTIONAL
WALL
GUARD
12”
12”