
Instructions / Assembly
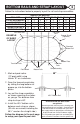


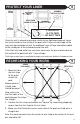


1 - Mark out pool radius
(1/2 pool width) using
stakes "B" as a reference.
2 - Form the two end semicircles
by sliding the long bottom rail
groove up, into the bottom
plates.
3 - Lay out the strap assemblies
as shown removing the stakes
as you go. The distance from
strap to strap is 48".
4 - Install the 45½” bottom rail in
between each strap as shown.
(All rails are curved, including the
45½” used on the straight side.)
Follow the diagram in the next page
to setup your specific pool size.
BOTTOM RAILS AND STRAP LAYOUT
4
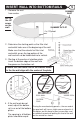
Ground Shield and Wall Guard
are optional.
Spread a ground shield or plastic sheeting over
prepared ground (not included). Ground Shield
and Wall Guard are available from your local
pool supply dealer or polyethylene sheeting can
be purchased from a local hardware supply.
This will protect your pool liner and metal parts
against chemical reactions from the ground soil.
11
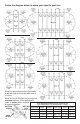
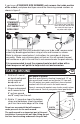
Follow the instructions below to properly layout the rail and strap assemblies.
QUANTITIES NEEDED:
POOL SIZE 18x12 20x12 24x12 24x15 30x15 33x18 39x18 45x18
STRAP ASSEMBLIES 2 2 3 3 4 4 6 7
45½” RAILS 2 2 4 4 6 6 10 12
STANDARD RAILS 8 8 8 8 8 10 10 10
TRANSITION RAILS 4 4 4 4 4 4 4 4
BOTTOM PLATES 10 10 10 10 10 12 12 12
EXAMPLE
OF BASIC
LAYOUT
Patio Block
Bottom Plate
Strap Assembly
45½”
Bottom Rails
Standard
Bottom Rail
Ground Shield
(Optional)
Transition
Rails
Transition Rails
Transition Rails
Transition
Rails
45½” Bottom Rail
48”