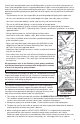
Part# 420363-22 DANGER GENERAL • Installation of this above ground pool is not very hard or confusing, but it is a big job. DO NOT DIVE OR JUMP INTO YOUR POOL • Take the time to follow instructions and do things right the first time. Your pool is approximately 4' deep. It is not designed for diving or jumping. If you dive or jump into your pool you run the risk of permanent injury or death. Alert all visitors and family of this and point out all warning labels supplied.
SAFETY TIPS - RULES AND REGULATIONS This section is designed to acquaint you with some guidelines as to the safe operation and use of your pool. DROWNING RISK • Children, especially children younger than five years, are at high risk of drowning. • Drowning occurs silently and quickly and can occur in as little as 2 in. (5 cm) of water. • Keep children in your direct sight, stay close, and actively supervise them when they are in or near this pool and when you are filling and emptying this pool.
SAFETY TIPS - RULES AND REGULATIONS • Never permit the pool to be used unless at least one person other than the bather is present. Children must always be under careful adult supervision. • Never leave the pool open and unattended. Remove the ladders or other means of entry when it is unattended. As a further precaution, the pool should be covered when it will not be used for any extended period of time. • Do not walk on, climb on, sit on, stand on, or dive from the top seat of the pool.
CONTRACT INSTALLATIONS The manufacturer is in no way affiliated with any professional pool installer. Therefore the manufacturer can assume no responsibility for errors in installation by the home owner or said professional installer. If you have your POOL installed by others, please supervise them to be sure they comply with the proper installation techniques shown. Their past experience or short cuts may not cover the latest improvements in our POOLS. Do not allow any short cuts of any nature.
Consult your local pool professional and building codes as to the use of earth retaining walls to recess your pool deeper than this recommended amount. Make sure that the pool remains full of water for at least 7 days before backfilling the pool recess. Place a layer of plastic film against the pool before backfilling to protect the pool from corrosion agents that may be found in the backfill materials. • The pool owner has the sole responsibility for providing adequate lighting for the pool area.
ground shield to be used between the surface and the pool liner (See step 2). Do not install your pool on peat moss, tar paper, gravel or chemically treated soil not approved for pool use. Any or all of these surfaces can ruin your pool and liner and will void your warranty. 5. Do not set up your pool under trees or under overhead wires. 6. DO NOT set up your pool near any existing structure such as your house garage, etc.
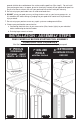
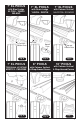
” XL POOLS with Steel Ledge XL 7000 • TANGO MILANO Top and Bottom Plate Fig. D 7” XL POOLS 7” XL POOLS with Resin Ledge YUKON • DESTIN with Column Vertical GALVESTON • RICHWOOD Top Plate Bottom Plate Fig. E Top and Bottom Plate Fig. F 7” XL POOLS 8” POOLS 10” POOLS TROPICANA • KEYSTONE with Column Vertical & Wrap Around Covers with Column Vertical & Wrap Around Covers MYSTIC II • PARADISE Fig. G Fig. H Fig.
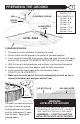
1 PREPARING THE GROUND 2”x 4” NAIL CLEARANCE RADIUS CENTER STAKE CARPENTER’S LEVEL CLEARANCE RADIUS = 1/2 POOL DIAMETER + 6" 12' Pool = 6' 6" 15' Pool = 8' 18' Pool = 9' 6" 21' Pool = 11' 24' Pool = 12' 6" 27' Pool = 14' 30’ Pool = 15’ 6” LEVEL AREA CLEARANCE RADIUS 1 - The pool must be installed on a solid level surface. 2 - Drive a stake into the ground at the center of your pool location.
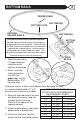
2 BOTTOM RAILS CENTER STAKE BOTTOM RAIL BOTTOM PLATE OPTIONAL GROUND SHIELD BOTTOM RAIL Ground Shield and Wall Guard are optional. Spread a ground shield or plastic sheeting over prepared ground (not included). Ground Shield and Wall Guard are available from your local pool supply dealer or polyethylene sheeting can be purchased from a local hardware supply. This will protect your pool liner and metal parts against chemical reactions from the ground soil.
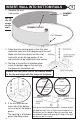
3 INSERT WALL INTO BOTTOM RAILS 1 - Remove the wall from carton. NOTE the UP arrow on the wall. SKIMMER INLET SKIMMER OUTLET 4’ x 4’ Plywood 2 - Determine the starting point as the filter inlet and outlet holes are at the beginning of the wall. Make sure that the cutouts for filter inlet and outlet are on the top portion of the wall and will not be hidden behind a vertical. 3 - Starting at the center of a bottom plate insert the bottom edge of the wall into the groove on the bottom rail.
4 CLOSING THE WALL 3/8" TRUSS HEAD SCREW WASHER View from the top Pool Wall WASHER Pool Wall 3/8 FLANGE NUT DANGER Recessed Posi-Lock System 1 - During this assembly procedure, make sure that one washer is on the inside of the pool, and one washer in on the outside of the pool sandwiching the two wall ends between them. Also ensure that the recesses of the walls and washers all face the same direction.
5 PROTECT YOUR LINER WALL SEAM EXTENDED END OF WALL VIEW FROM INSIDE OF POOL 3 LAYERS OF TAPE SKIMMER RETURN FITTING SKIMMER INLET FITTING 3 LAYERS OF CLOTH TAPE OR DUCT TAPE Once the wall is closed and screws and nuts are tightened securely, cover the screw heads on the inside of the pool with 3 layers of cloth tape all the way from top to bottom of wall. An additional layer of tape should be added to the inside part of the extended end of the wall.
1 - Build earth mound on top of wall guard using screened damp earth or pre-washed sand. OPTIONAL WALL GUARD 2 - Shape and compact earth mound to run 8" up from ground and 8" away from the wall. 8” Do not use any material that will compress under pressure for the earth mound. The earth mound is an important part of the pool installation. It prevents the wall from lifting up and the liner from sneaking underneath the pool wall.
If you have a STANDARD SIZE SKIMMER, only remove the inside section of the cutout, and place duct tape around the remaining scored sections as shown in figure 2. 2 SMALL STANDARD SKIMMER CUT INSIDE AREA ONLY On inside of wall, tape over holes and slots that will not be used with duct tape or any other cloth tape. 3 If the through wall filter inlet and outlet holes are to be used, remove metal cutouts by breaking perforations using a knife and hammer as shown.
INCORRECT CORRECT POOL LINER POOL WALL AIR SPACE POOL LINER EARTH MOUND STANDARD OVERHANG LINER 1. Clear all sticks and sharp objects from an area near the pool, that is as large as the pool itself. TOP RAIL PLASTIC EDGING 2. Remove the liner from its carton and unfold and open the liner. 3. Refold the liner so that it can easily be carried to the pool and unfolded from the outside of the pool. Check the levelness of the sand in the pool and make sure that no sharp objects are still in the pool. 4.
EZ HOOK LINER INSTALLATION ATTENTION: An 8 inch cove must be placed all around the inside of the pool 1. Clear all sticks and sharp objects from an area near the pool, that is as large as the pool itself. COVE 2. Remove the liner from its carton and unfold and open the liner. 3. Refold the liner so that it can easily be carried to the pool and unfold from the outside of the pool. Check the levelness of the sand in the pool and make sure that no sharp objects are still in the pool.
VERTICALS 10 If fencing or decking is to be installed, refer to the deck and fence instructions before installing verticals. The holes indented in the face of the verticals must be on top. If your pool is equipped with feature tape, it is best to apply it to the verticals at this time. VERTICAL Attention: If your pool has the 2 piece resin vertical, insert the flat piece into the vertical before installation, as shown. No.
PRE-ASSEMBLY OF TOP PLATES* 11 *NOTE: CAGE NUTS NOT NEEDED ON ALL POOLS - CHECK YOUR PACKING LIST Before the top plates are installed it is necessary to attach the cage nuts* in their appropriate locations as shown in the figures at right. Using a pliers, squeeze together the spring sides of the cage TOP PLATE WITH CAGE NUT nuts and insert them into the top plate from underneath.
INSTALLING LEDGES 13 AND PLACEMENT OF WARNING LABELS SCREW HOLE LOCATION GUIDE Refer to the "Construction Close-ups" at the beginning of these Instructions as indicated below: FIG. A FIG. C, D, E, G, H & I 15 ft. 18 ft. 1 1 4" Ledge/ 4" Vertical B&D B&E B&E 6" Ext. Ledge/ 6" Old Extruded Vertical A&D A&D A&D 1 3 2 6" Ledge/ 6" Vertical E&C 6" Ledge/ 6" Vertical 2 FIG. F 12 ft. 6” Ext. & 7" Ledge/ 6" Box Vertical 9" & 10” Ledge/ 8" Box Vertical A C B E E 1 27 ft. 30 ft.
Your pool is equipped with (3) three special warning ledges. The (1) one ledge with a large warning on top is to be installed by the entry point into the pool and is not to be obstructed by any object such as your ladder. The (2) two ledges with the warning on the inside are to be placed opposite the entry point into the pool with the warning facing the entry point. THESE WARNINGS ARE NOT TO BE REMOVED UNDER ANY CIRCUMSTANCES DANGER Your pools top ledge was not designed to be a walk around.
6" & 7" TWO-PIECE FULL CONTOURED COVER Slide inside cover (the cover which will be closest to the inside of the pool) into position and place outside cover onto top of inside cover aligning the holes together with cage nut attached to the top plate and secure using the 1/4”-20 x 3/4” screw provided. The two (2) edges of the covers should be parallel. Before tightening the screws, press the two covers firmly together.
1/4”-20 X 3/4” STAINLESS STEEL SCREW 2 - Secure using the 1/4”-20 x 3/4” screw provided. 3 - Slide the outside cover onto the inside cover. Make sure the inside cover is in the slot of the outside cover. 2 4 - Align the holes on the side of the bottom wrap with the holes on the top of the vertical. 3 Secure the cover using the #12 x 1/2” screws provided. The two (2) edges of the covers should be parallel. Before #12X1/2” SCREW tightening the screws, press 1 ON EACH SIDE the two covers firmly together.
7" XL TWO-PIECE WRAP AROUND TOP & BOTTOM COVERS 7” XL WRAP AROUND TOP COVER 1 - Insert the logo into the cover. 1 2 - Slide the outside cover into position and align the hole in the cover with the cage nut attached to the top plate. Secure using the 1/4”-20 x 3/4” screw provided. OUTSIDE COVER LOGO 3 - Insert the front of the top cover into the hole in the front of the outside cover.
WRAP AROUND BOTTOM COVER 1 - Insert the logo into the bottom cover. 2 - Place the bottom cover onto the bottom of the vertical and align the holes on the side of the wrap with the holes on the bottom of the vertical. 3 - Secure the bottom cover using the #12 x 1/2” screws provided. 1 2 #12X1/2” SCREW 1 ON EACH SIDE 3 WARNING WARNING LABELS 15 Four (4) danger labels have been provided for your safety. Apply these labels to the pool where they are easily visible to all persons using the pool.
SAFETY BROCHURES AND EDUCATION PROGRAMS 17 Educational programs and materials, (i.e. seminars, workshops, brochures, videos, instructional guides, etc.) are available from NSPI, NSPF, other aquatic safety groups, and by private firms. As a means of communicating useful safety information to pool owners and users industry members are permitted to provide such information to owners and to request or require owners to sign a statement that they have received, read and will follow the guidelines.
LIFE SAVING EQUIPMENT It is recommended that one or more of the following lifesaving items are on hand at all times within the pool area. A. A light, strong, rigid pole (shepherd's crook) not less than 12' long with blunt ends. B. A 1/4" diameter throwing rope as long as 1 1/2 times the maximum width of the pool, or 50' whichever is less, which has been firmly attached to a ring buoy with an outside diameter of approximately 15" or some other similar flotation device.
Chlorine is the most commonly used bacteria killer for water. To make the chlorine work properly it is necessary to keep the pool water at the proper acid-alkaline balance. A reliable pool water test kit will help to determine the daily chlorine dosage and the acidalkaline condition of the water. You will find in the test kit two different color comparators. The yellow side is for chlorine.
PREVENT DROWNING. NEVER SWIM ALONE. WATCH CHILDREN AT ALL TIMES. KEEP A 4 FT. CLEAR SPACE AROUND POOL FREE OF ANY OBJECTS THAT MAY PROVIDE ACCESS TO THE POOL To view installation video visit: http://www.swimnplay.com/customerservice/roundvideo.