
Instructions / Assembly


20
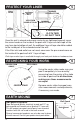
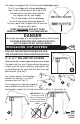
INSTALLING TOP COVERS
14
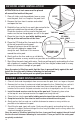
Your pool is equipped with (3) three special warning ledges.
The (1) one ledge with a large warning on
top is to be installed by the entry point into
the pool and is not to be obstructed by
any object such as your ladder.
The (2) two ledges with the warning
on the inside are to be placed opposite
the entry point into the pool with the warning
facing the entry point.
THESE WARNINGS ARE NOT TO BE
REMOVED UNDER ANY CIRCUMSTANCES
DANGER
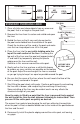
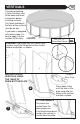
Your pools top ledge was not designed to be a walk around.
CAUTION EVERYONE WHO USES YOUR POOL
NOT TO WALK OR SIT ON THE LEDGE!
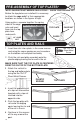
FOLLOW THE INSTRUCTIONS BELOW FOR
THE COVERS FOR YOUR PARTICULAR POOL
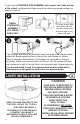
4", 6" & 7" DELUXE TOP COVERS
These covers don’t require cage nuts or top cover screws.
For pools with the new 1-piece deluxe top covers,
simply snap the cover into place, aligning the tab
on the bottom of the cover with the slot in the top
plate of pool (fig.A only.)
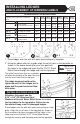
For 2-piece covers, insert bottom
section into top (fig. 1) so that it
becomes one unit (fig. 2).
Then snap cover into place aligning
tab on bottom of cover with slot in
the top plate of pool (fig. 3) and secure with a #10 x 1" screw (fig. 4).
A
1
#10X1” SELF
TAPPING
SCREW
2
3
4
IMPORTANT: Make
sure that the inside
edge of the top cover
is securely positioned
over the edge of the
ledges