
Instructions / Assembly

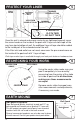
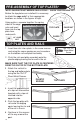
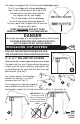

1 - Place ledges over the wall with each end resting on a top plate.
2 - Using the above chart as a guide align the set of holes in the top plate as
shown in the above drawing for your size pool with
the holes in the ledge and insert the No.12x1/2" Sheet
Metal Screw through the ledge and into the top plate.
The actual screw holes that are used does
not affect the integrity of the pool. You may
use the set of holes that line up best!
The ledge screws should not be
tightened until all the ledges are in
place and the pool has been filled
with water.
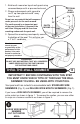
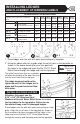
SCREW HOLE LOCATION GUIDE
Refer to the "Construction Close-ups" at the
beginning of these Instructions as indicated
below:
12 ft.
ROUND
15 ft.
ROUND
18 ft.
ROUND
21 ft.
ROUND
24 ft.
ROUND
27 ft.
ROUND
30 ft.
ROUND
4" Ledge/ 4" Vertical
B & D B & E B & E C & E C & E
6" Ext. Ledge/
6" Old Extruded Vertical
A & D A & D A & D
A & D
A & E
A & E
A & D
A & D
A & E
A & E
6" Ledge/ 6" Vertical
E & C E & C E & C E & B E & B E & B E & B
FIG. A
6" Ledge/ 6" Vertical
E & C E & C E & C E & B E & B E & B E & B
FIG. C, D, E,
G, H & I
6” Ext. & 7" Ledge/
6" Box Vertical
A & D A & D A & D A & E A & E A & E A & E
FIG. F
9" & 10” Ledge/
8" Box Vertical
A & C A & C A & C A & D A & D A & D A & D
19
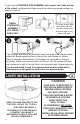
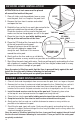
INSTALLING LEDGES
AND PLACEMENT OF WARNING LABELS
13
1
1
1
3
2
2
B
E
A
D
C
CDE
B
A
A
B
C
1
2
A
CB
E
D
B
EDC
DE
3
C
B
ED
No. 12 x 1/2”
Sheet Metal
Screw
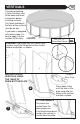
INSTALLING RESIN LEDGES
Attention: You must use the
5/16” x 3/4” OD Stainless Steel
Washers with each Sheet Metal Screw to secure
the top ledges to the top plates. Failure to use
the washers may result in damaged ledges.
Place ledges over the wall with each end resting on a top
plate. Align the set of holes in the top plate as shown in
the instructions for your size pool with the holes in the
ledge and insert the No.12x1/2" Sheet Metal Screw
through the washer and the ledge and into the top plate.