
Instructions / Assembly


12
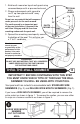
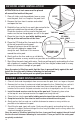
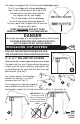
Using the center stake make sure your
pool is completely in true round by
measuring from the center of the stake
to inside of pool wall in all directions,
making sure these measurements
are equal.
Remove center stake from pool area
after measurements and adjustments,
if necessary, are made.
POOL WALL
VIEWED FROM
ABOVE
RADIUS
CENTER STAKE
3 LAYERS OF
CLOTH TAPE
OR DUCT TAPE
VIEW FROM
INSIDE OF POOL
WALL
SEAM
SKIMMER
INLET FITTING
SKIMMER
RETURN FITTING
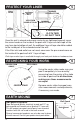
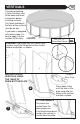
Once the wall is closed and screws and nuts are tightened securely, cover
the screw heads on the inside of the pool with 3 layers of cloth tape all the
way from top to bottom of wall. An additional layer of tape should be added
to the inside part of the extended end of the wall.
If the filter inlet and outlet are not used, cover over the pre-scored areas on
the inside of the pool wall with 1 layer of tape.
Cloth tape or duct tape is available through your local pool dealer or hardware store.
EXTENDED
END OF
WALL
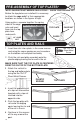
PROTECT YOUR LINER
5
3
LAYERS
OF TAPE
RECHECKING YOUR WORK
6
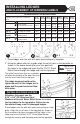
EARTH MOUND
7
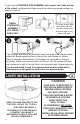
Wall guard is optional.
Tape wall guard (plastic sheeting) to pool wall 12" up
from ground and smooth out on ground 12" from wall.
This will protect your pools metal parts from chemical
reactions with the soil used in the earth mound.
Several commercial products can also be used in place
of earth mound. Consult your professional pool dealer.
Wall Guard
12”
12”
Earth Mound
8”
8”