
Instructions / Assembly

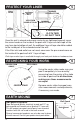
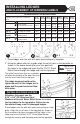
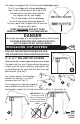

CLOSING THE WALL
4
3/8" TRUSS
HEAD SCREW
WASHER
WASHER
Pool Wall
Pool Wall
3/8 FLANGE
NUT
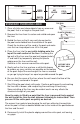
11
DANGER
YOU MUST ASSEMBLE
THE POOL WALL
AS PER INSTRUCTIONS
USE ALL THE 3/8-16x3/4"
TRUSS HEAD SCREWS,
WASHERS AND 3/8-16
SERRATED FLANGE NUTS
TO CLOSE POOL WALL.
DO NOT LEAVE ANY
OPEN HOLES
TIGHTEN EACH SCREW
TO 85 INCH POUNDS.
View from
the top
Recessed
Posi-Lock System
1 - During this assembly procedure, make sure
that one washer is on the inside of the pool,
and one washer in on the outside of the pool
sandwiching the two wall ends between them.
Also ensure that the recesses of the walls
and washers all face the same direction.
2 - Align the holes in the wall ends. From the inside of the pool, insert a
3/8 Truss Head screw through the washer, through the holes on the inside
and outside wall ends, and through the second washer.
3 - Fasten with 3/8 serrated flange nut on the outside of the pool having
the flange of the nut face the washer. ONLY HAND TIGHTEN THE NUTS
AT THIS POINT. Continue for each hole in the wall ends.
DO NOT LEAVE ANY OPEN HOLES.
4 - Tighten all screws and nuts to 85 inch pounds. If no torque wrench is
available, tighten each nut until snug. Then tighten each nut one half (1/2)
additional turn. If nut appears to be lose after tightening, please check
if the screw is stripped or broken. If it is, it must be replaced.
Overtightening the nuts could cause the screws to fracture which could result in
pool failure. Failure to tighten the nuts sufficiently could also result in pool failure.
This is one of the most important structural assembly aspects you will perform.
Be absolutely sure you have assembled the wall as shown above for your pool.
Manufacturer can not assume the responsibility of the performance of this
product if the instructions of closing the wall are not followed exactly.