
Installation Guide

ATTACHING TO WALL
Generally, FRP panels can be installed using adhesive alone, fasteners alone, or a combination of adhesive and fasteners. The method used
should be determined by the room and wall conditions (see the wall conditions noted on pages 4 & 5). Check your local building codes for
any restrictions or guidelines regarding approved installation methods.
BEFORE STARTING, DETERMINE WHICH SEAM TREATMENT IS BEING USED. PLEASE REFER TO THE APPROPRIATE INSTRUCTIONS FOR
THE TYPE OF SEAM TREATMENT BEING USED.
Moldings | Color Coordinating Caulk | Seam Sealant
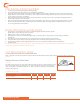
Applying Adhesive
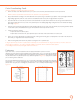
When adhesive is used, be sure that it is an FRP-formulated product. FRP adhesives are widely
available. Follow the adhesive manufacturer’s recommendations for trowel style (e.g., appropriate
height of adhesive bead left by trowel). It is important to apply adhesive carefully and follow all
directions to prevent problems that may result from using too little or too much adhesive. 100%
adhesive coverage applied to the entire back of the panel is recommended by using a “crosshatch”
pattern. Adhesive should extend to all edge s of the panel and should be applied directly to the back
of each individual FRP panel.
(Figure 4) Do not apply adhesive to wall.
Spacing
All FRP panels have expansion characteristics due to changes in humidity and temperature that must be accounted for during installation
with proper spacing around panel edges and around fixtures attached to the panel/wall. Adequate space must be allowed for panel
expansion and contraction. For a 4’ x 8’ panel, a minimum gap of 1/4” is required at the top and bottom of each panel and 1/8” between
panels. More room will be required for longer panels. It is recommended that panels do not exceed 48” in width and 12’ in length to aid in
ease of installation and ensure a satisfactory finished installation. See the FRP panel Expansion Joint
Chart for appropriate spacing at ceiling, floor and between panels.
When a moisture resistant installation is required, silicone sealant should
be applied in all moldings around all panel edges, fastener, and fixtures.
REFER TO SEAM TREAT OPTIONS FOR SPECIFIC EXPANSION JOINT CHART.
Panel and Seam Treatment Sequence
Depending on your seam treatment selection, panels are either installed in sequence with the
seam treatment or panels are installed independently. Before starting, determine which seal
treatment is being used.
MOLDINGS
When using moldings, panels and molding are installed in sequenced.
COLOR COORDINATING CAULK AND SEAM SEALANT
When using caulk and sealant, all panels are installed prior to the seam treatment. Before caulk
and sealant can be applied, installed panels need to be adhered for at least 6 hours.
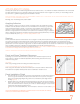
Panel Installation Finish
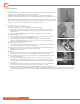
• Use a laminate roller to ensure all air pockets are removed between the panel and the wall and
to ensure a good bond between the panel and the wall. Start in the top corner of the panel
away from the leading edge. Begin rolling down and out towards the panel edge without a
molding.
(Figure 5)
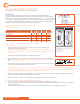
• Adhesive residue may make panels appear stained and will collect dirt. Remove any adhesive
residue upon completion of the job. To remove latex-based adhesive, clean with a non-abrasive
cotton cloth and warm water. If necessary, use a mild, non-abrasive detergent. For best results,
change water and cleaning rags frequently. For
clean-up with solvent based adhesives, use mineral spirits or acetone to remove residue
(Figure
6)
.
NOTE: SOLVENT-BASED OR ABRASIVE CLEANERS SHOULD NOT BE USED ON DESIGNS
PANELS OR PATTERN MATCHED MOLDINGS
FIGURE 4
FIGURE 5
FIGURE 6
7