
Installation Guide
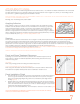


SEAMS AROUND DOOR AND WINDOW FRAMES OR OTHER SPECIAL APPLICATION AREAS
1. Repeat process listed in Vertical Flat Panel Seams.
2. Material should be dispensed into each seam at a rate such that the seam is completely
filled with sealant but completed within the necessary open time for the sealant. As these
seams typically have a larger gap, they may not be able to be filled by the
sealant in one pass. In that situation, an initial “filler bead” can be applied and then
a secondary bead can be applied over the top of the initial bead after initial bead
has reached full cure.
A. A mechanical filler, such as weather-strip putty, may also be used to fill large gaps prior
to the application of the Urethane Sealant.
B. IMPORTANT NOTE: A larger mass of sealant, which is likely present in these types of
seams, will lower the available open time during which the material can be successfully
smoothed.
3. Smoothing the Sealant
A. After the sealant has been dispensed, smooth the sealant beads flush with the panel surface. Since these joints are larger
and often have an irregular shape, it is at the discretion of the installer to determine the best method for smoothing the joint. A
combination of common smoothing tools may be required. (Inline seam finisher should be used for small in-line panel seams or
larger radial seam finisher used for corners.)
B. Smoothing of the sealant must occur within the open time of the sealant.
C. As soon as the smoothing of the sealant is complete, remove the painters tape. Any excess sealant on panels can be cleaned
using a solvent dampened rag.
SEAM SEALANT CLEANING
Clean equipment and tools prior to the sealant cure with organic solvents such as isopropyl alcohol.
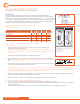
Speciality Installations
Ceiling Panel
LAY-IN CEILINGS
For lay-in ceiling grid systems, in order to avoid unacceptable deflection, purchase factory pre-cut
ceiling panels. To install ceiling panels, lay into ceiling grid. Trim as necessary to accommodate
lighting or other fixtures.
Always leave a 1/8” gap between panel and grid or fixture to allow for normal panel expansion and
contraction. FRP grid systems may require specially sized ceiling panels. See the FRP grid system
installation guide. Do not attach ceiling grid through top of panels.
WHEN USING FRP PANELS IN A CEILING GRID
In order to minimize gaps between the panel and the grid system, Crane Composites strongly
recommends FRP ceiling panels be used with butt-end ceiling grid systems. Smooth FRP panels
will highlight the space between the grid and a flush mount ceiling panel. Crane Composites is not
responsible for space between panel and grid when overlay grid systems are used. For optimal
results use Sanigrid II - Fiberglass Ceiling Grid System.
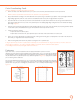
Car Wash
Using FRP panels that have been factory laminated to fluted polypropylene is the ideal
solution for lining the interior walls of a car wash, with its high moisture environment. The expansion and contraction due to thermal changes
and extended exposure to moisture
can, however, cause any frp panel product to expand.
Bulging from expansion can be minimized if panels are installed properly. The key to a
satisfactory installation in such a high moisture environment is to provide adequate clearance around fasteners, moldings, pipes, and
junctures so the panels are free to expand and contract. As little as 1/64” change in length can cause bulging if there is no clearance for a
panel to expand. NOTE: Bulging of panels in a car wash installation is not cause to consider the panels defective. In general, follow the wall
panel installation instructions within this guide.
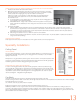
FIGURE 24: TYPICAL WINDOW SEAM APPLICATION
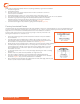
FIGURE 25
13