
Installation Guide
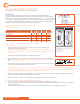
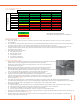


Seam Sealant Workability Time
1/8” - 3/16” Bead
IMPORTANT INSTALLATION NOTE
Seam Sealant workability begins at initial dispense
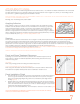
APPLY URETHANE SEALANT TO SEAMS/JOINTS
General Process notes:
1. At end user discretion as to the number of operators used for the seam seal application process. A minimum of two operators is
recommended.
2. If one operator is used, then each seam will have to be processed individually (filled and then smoothed by the same operator before
moving on to the next seam). A new mixing tip will likely need to be used for each seam in this case.
3. For multiple operators (two or more), the end user may design the process such that one operator can dispense, while a second
operator can follow and smooth the joints. Care will need to be taken to ensure that the open time of the material is not
exceeded in these scenarios.
4. Seam Seal Process order should be:
A. Vertical flat panel seams
B. Vertical outside corners
C. Vertical inside corners
D. Floor and/or ceiling joints
E. Windows and door frames
VERTICAL FLAT PANEL SEAMS
1. Vertical Seams should be processed first as they are intended to be smoothed flat with the panel.
Inside corners, floor, and ceiling joints are smoothed such that the seam sealer
stands proud of the surface, which would require placement over any vertical seams that
may interface with these joints.
2. Material should be dispensed into each seam at a rate such that the seam is completely
filled with sealant but completed within the necessary open time for the sealant. It is
recommended that sealant is installed in sections no longer than 3’ for all panel length as a bench
mark. Section length will vary dependent on environmental conditions at job site.
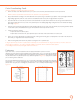
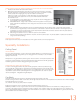
3. It is recommended to pull dispensing gun away from bead during application.
4. A good technique is to add a small horizontal piece of painters tape every 3’ and ensure
that there is enough sealant in the cartridge to complete a full seam. Performing a cartridge
change in the middle of a seam application could increase the risk of exceeding the open
time of the sealant
(Figure 17).
5. If the seam has a large gap and/or cannot be filled by the sealant in one pass, an initial “filler bead” can be applied and then a
secondary bead can be applied over the top of the initial bead after initial bead has reached full cure. Mechanical filler, such as weather-
strip putty, may also be used to fill large gaps prior to the application of the urethane seam sealant.
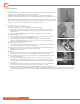
6. Smoothing the sealant
A. After the sealant has been dispensed, smooth the sealant beads flush with the panel surface using the Inline Seam Finisher.
B. Finishing/smoothing tools and techniques are at the discretion of the operator and/or the end user.
C. Smoothing of the sealant must occur within the open time of the sealant.
D. As soon as the smoothing of the sealant is complete, remove the horizontal painters tape.
7. Remove horizontal tape and begin next 3’ section. A good technique is to apply the sealant below the previous section and “bump up”
the sealant into the previous section
(Figure 19).
8. Once the all sections of the wall are completed, remove the vertical painters tape. Remove Any excess sealant on panels can be
cleaned using a solvent dampened rag
Temperature (°F)
70 80 90 100
Time (Minutes)
1
2
3
4
5
6
7
8
9
10
Workable
Suspect
Not Workable
FIGURE 17: APPLYING THE PAINTER TAPE
HORIZONTAL IN 3’ SECTIONS
11