
Manual


5
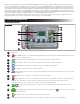
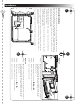
Zone Expansion Module Installation
e EVOLUTION® controller can be expanded using the optional 4-zone (EMOD-4) or 12-zone (EMOD-12) modules to add more zones
to the system.
Module Installation
A
A
B
B
Figure 9 Figure 10
Step 1 – Open the EVOLUTION
®
controller door and control panel to access the internal components.
Step 2 – Locate the module slot
A
and
B
. Install the module by placing the bottom hooked standos into slot
A
and push the module
tab towards the cabinet until a positive click is achieved. e click indicates that the module’s retaining tab is fully engaged.
Once installed, the EVOLUTION
®
controller will be able to read the additional zones and will make them available for
scheduling.
Note: If installing only one four-station module (EMOD-4), it must be installed in the zone 5-8 module slot.
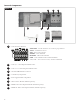
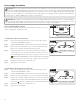
Module Removal
Step 1 – Open the EVOLUTION
®
controller door and control panel to access the
Figure 11
internal components.
Step 2 – Hold the module as shown in Figure 11. Press the retaining tab while pulling
the top of the module away from the cabinet, then lift the module out of
the controller.
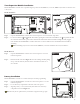
Battery Installation
Figure 12
e EVOLUTION
® controller uses a 9-VDC battery for arm-chair programming.
Step 1 – Open the EVOLUTION® controller door and control panel to access the
internal components.
Step 2 – Locate the battery compartment at the back of the control panel.
Step 3 – Align the polarity (– and +) of the battery then slide it into the battery
compartment as shown in Figure 12.
Note: You may need to pull the battery tab forward to align the battery properly.
+–