
Manual


1
ank you for purchasing Toro’s new award-winning EVOLUTION
®
Series irrigation controller, delivering unprecedented control and
ease-of-use of your irrigation system! Based on years of customer research, the EVOLUTION
®
Series irrigation has the perfect balance of
simplicity and sophistication. e modern-day programming, unique USB functionality, and smart capability make it an ideal choice for
users seeking an advanced irrigation controller without the complexity. With the addition of Smart Connect
®
, there are multiple options
available to upgrade the controller to automatically adjust watering, or control other devices such as lighting or water features. Using the
Smart Connect
®
Weather Sensor, the EVOLUTION
®
controller meets the requirements of the EPA WaterSense
®
Program. You can even set
your programs using a computer by utilizing the simple-to-use EVOLUTION
®
Scheduling Advisor.
If you have any questions about the controller, please call us toll-free at 1-877-345-8676 and we will be happy to help. From locations
outside North America, please send your questions to the evolution@toro.com e-mail address.
Controller Introduction
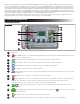
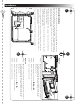
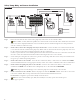
Timing Mechanism
1
2
3
4
5
6
7
13
12
11
10
9
8
Figure 1
1
– LCD Screen
2
– Water O Button. Use to turn o scheduled and manually activated watering. For extended watering o periods, you
can select 1-14 days or Remains O.
3
– Water Now Button. Use to manually activate a schedule, specic zone(s) or All Zones Test.
4
– Schedules Button. Use to set your active watering day(s), schedule start(s) and zone runtime(s).
5
– Adjust Water Button. Adjust your watering percentage per schedule or zone runtimes.
6
– Review Button. Use to review your schedule parameters.
7
– Advanced Button. Use to access the controller’s advanced features, from zone and schedule details to sensor setup and
controller diagnostics.
8
– Home Button. Use to display the controller’s activity and alert messages.
9
– Help/Setup Button. Use to access and clear alerts, set the controller’s time and date, locate Toro contact information
and local service information, as well as modify controller preferences such as the display language and time and
date format. Use Setup also to save or load a schedule to or from your USB thumb drive.
10
–
Up and Down Arrow Buttons. Use to navigate up or down through the menu items. ey are also used to
modify parameters.
11
–
Left and Right Arrow Buttons. Use to navigate between menu parameters. e
button is also used to revert back
to previous menu selections.
12
– Select Button. Use to select a menu item or enter and save parameters.
13
– LED Indicator. Indicates that Water O is active (constantly lit) or an Alert condition is detected (ashing).