
Manual


20
Sensors
e Sensors function allows you to assign a rain sensor to each of the schedules. Schedules with a rain sensor assigned will not water when
the sensor is activated.
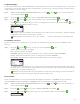
Step 1 – While in the ADVANCED menu, use the Up or Down arrows to select the SENSORS. Press SELECT .
Step 2 – Use the Up or Down arrows to select the sensor you want to set.
Step 3 – Use the Left or Right arrows to select the schedule.
Step 4 – Use the Up or Down arrows to place a check mark under the desired schedules to assign the rain sensor. When the
rain sensor is activated, EVOLUTION
®
will prevent schedules from operating. Replace the check mark with a dash to disable
the sensor for that schedule.
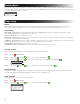
SENSORS
A B Ca
RAIN
Use the Right arrows to access the sensor setup screen.
RAIN SENSOR
DRYOUT DAYS OFF
CURRENT STATE IS DRY
Step 5 – Select Rain Delay. Press SELECT or Right arrows to navigate to the parameter.
Step 6 – Use the Up or Down arrows to set a delay of 1-14 days or OFF. e rain delay is the waiting period after the rain
sensor is detected to be dry.
Diagnostics
e EVOLUTION
®
controller provides a diagnostic function to check whether the system’s zones are properly functioning. When
activated, the controller will test each available zone. For Firmware versions prior to 1.14, EVOLUTION
®
will display dashes (--) for zones
that are being tested and have not been tested, OK for zones working within the current draw range, OVERCRNT for zones drawing above
the recommended current draw, or SHORT for zones that have a grounded circuitry.
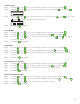
DIAGNOSTICS
ZONE TEST
ZONE CURRENT TEST
MASTER VALVE OK
ZONE 1 OVERCRNT
ZONE 2 SHORT
ZONE 3 ––
ZONE CURRENT TEST
MASTER VALVE 0.178
ZONE 1 0.180
ZONE 2 OPEN
ZONE 3 OPEN
Prior to Version 1.14 Starting Version 1.14
For Firmware versions 1.14 and greater, EVOLUTION® will display dashes (– –) for zones that have not been tested. It will display the
current level in amps. OVERCRNT will be displayed for zones drawing above the recommended range, SHORT for zones that have a
grounded circuitry, or OPEN if no current is measured.
Firmware Update
e EVOLUTION controller can be updated by downloading the latest controller rmware from Toro’s website, loading the rmware onto
a USB drive, and inserting it into the controller’s USB port. ere are two dierent methods to load the rmware depending on the version
currently running on your EVOLUTION controller. To nd your current version, at the controller navigate to and select FIRMWARE in the
ADVANCED menu.
Check Firmware Version of Controller
e EVOLUTION
®
controller has the ability to be updated when new features and capabilities are made available. e updates are made
with newer Firmware versions.
To check the controller’s Firmware version:
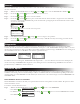
Step 1 – While in the ADVANCED menu, use the Up or Down arrows to select FIRMWARE.
– Press SELECT .
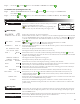
FIRMWARE
CONTROLLER 01.09
– For Firmware version 2.13 or greater, you must use the Up or Down arrows to select the VERSION menu and then
Press SELECT .
FIRMWARE
VERSION
UPDATE