
Manual


18
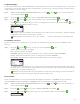
Set MV/Pump Delay
Use the MV/Pump Delay function to set a wait time between activating the master valve or pump, and activating the rst zone in the
schedule. is delay is usually used to allow the system enough time to build pressure for proper operation, or to ll the irrigation piping
system with water.
Step 1 – While in the ADVANCED/SCHEDULE DETAILS menu, use the Up
or Down arrows to select the Schedule you
want to edit. Press SELECT .
Step 2 – Use the Up
or Down arrows to navigate to MV/PUMP DELAY. Press SELECT .
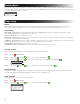
Step 3 – Use the Up or Down arrows to adjust the delay time as necessary. Press SELECT .
SCHEDULE A
ERASE SCHEDULE
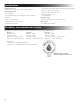
MV/PUMP DELAY 00:10
ZONE DELAY OFF
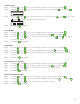
Set Zone Delay
Use the Zone Delay function to set a wait time after a zone ends watering and before another zone is activated. is delay is usually used
when the system is being fed by a well. e delay is used to allow the well enough time to recharge.
Step 1 – While in the ADVANCED/SCHEDULE DETAILS menu, use the Up
or Down arrows to select the Schedule you
want to edit. Press SELECT .
Step 2 – Use the Up or Down arrows to navigate to ZONE DELAY. Press SELECT .
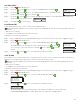
Step 3 – Use the Up
or Down arrows to adjust the delay time as necessary. e delay can be set between 10 seconds to 30
minutes in 10-second increments. Press SELECT .
SCHEDULE A
MV/PUMP DELAY OFF
ZONE DELAY 00:10
MV/PUMP IN DELAY OFF
Set MV/Pump In Delay
Use the MV/Pump In Delay to set whether the master valve or pump is active during zone delays. e default is set to OFF.
Step 1 – While in the ADVANCED/SCHEDULE DETAILS menu, use the Up
or Down arrows to select the Schedule you
want to edit. Press SELECT .
Step 2 – Use the Up or Down arrows to navigate to MV/PUMP IN DELAY. Press SELECT .
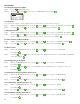
Step 3 – Use the Up or Down arrows to set the MV/Pump In Delay to ON or OFF during zone delays. Press SELECT .
SCHEDULE A
MV/PUMP DELAY OFF
ZONE DELAY OFF
MV/PUMP IN DELAY ON
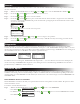
Auxiliary Schedule
Set Status
Step 1 – Use the Up
or Down arrows to select the Auxiliary Schedule you want to edit, then press SELECT .
Step 2 – Use the Up or Down arrows to navigate to the STATUS, then press the Right arrow or SELECT .
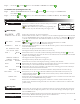
Step 3 – Use the Up or Down arrows to ENABLE (turn on) or DISABLE (turn o) the schedule. Press SELECT to save.
AUX 1
STATUS ENABLED
ACTIVE DAYS
START OFF
RUNTIME OFF