
Manual


17
Set Monthly Adjust
Use the monthly adjust function to allow EVOLUTION
® to automatically increase or decrease your watering with respect to the seasons for
all zones assigned to the schedule. During the winter and spring months, it may be necessary to decrease watering. In the summer months,
it might be necessary to increase watering.
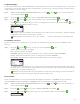
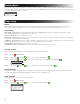
Step 1 – While in the ADVANCED/SCHEDULE DETAILS menu, use the Up or Down arrows to select the Schedule you
want to edit. Press SELECT .
Step 2 – Use the Up or Down arrows to navigate to MONTHLY ADJUST. Press SELECT .
Step 3 – Use the Up or Down arrows to select the month you want to edit. Press SELECT . Use the Up or
Down arrows to enter the percentage you want your watering duration to increase or decrease. Press SELECT to save.
Repeat Step 3 for the remaining months as necessary.
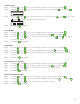
MONTHLY ADJUST
JANUARY -50%
FEBRUARY ---
MARCH ---
APRIL ---
MAY ---
As an example, a runtime of 10 minutes with an adjustment of +50% will increase the actual runtime to 15 minutes. Similarly,
an adjustment of -50% will decrease the runtime to 5 minutes.
Note: Adjustment can be made from +150 to -95%, or OFF. “– – –” indicates no adjustment to the watering schedule.
Set Schedule as Grow In
Use the Grow In function to set the schedule to cycle watering for an extended period of time. is aids in the establishment of new
landscape.
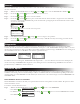
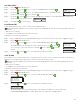
Step 4 – Use the Up
or Down
arrows to select the proper value. Press SELECT to save.
START – Enter the start time of the schedule.
END – Enter the end time of the schedule.
RUNTIME – Enter the duration each zone will run in a cycle. Set runtime in hours and minutes (HH:MM).
DELAY – Enter the duration between each cycle. Set delay in hours and minutes (HH:MM).
END AFTER – Enter the number of days the Grow In schedule will be active. Select from 1-90 days.
GROW IN
START 07:00AM
END 05:00PM
RUNTIME 00:05
DELAY 00:20
END AFTER 10 DAYS
For example, this Grow In schedule starts at 7:00am. Each zone in the schedule will run for 5 minutes. ere will be a delay of
20 minutes before each zone will run for another 5 minutes. is cycle will continue until 5:00pm. e Grow In schedule will
end and revert to the regular schedule in 10 days.
Note: Restricted days will not aect the Grow In schedule. An activated rain sensor will keep the Grow In schedule from
running. e rain delay feature will be ignored while the Grow In schedule is active.
Erase Schedule
Use the erase schedule function to reset the selected schedule. e schedule’s status will be set to DISABLED (except for schedule A, it
remains ENABLED) and the schedule TYPE set to WEEKDAYS. All other settings within the schedule will be set to OFF.
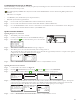
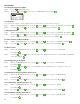
Step 1 – While in the ADVANCED/SCHEDULE DETAILS menu, use the Up or Down arrows to select the Schedule you
want to edit. Press SELECT .
Step 2 – Use the Up
or Down arrows to navigate to ERASE SCHEDULE. Press SELECT .
Step 3 – Use the Up
or Down arrows to Yes to proceed to erase the schedule or No to cancel. Press SELECT .
ERASE SCHEDULE
ARE YOU SURE? NO