
Manual


Set a fertilizer schedule
o Enter the ADVANCED menu
o Scroll down and select FERT DETAILS
o There are two steps to setting up an injection program
Selecting the valve terminal to function as a fertilizer pump
Setting up the program itself.
o Step 1 – selecting the valve terminal to function as a fertilizer pump
Your controller has screws, or terminals that are typically used to connect to the
valve wires. What you are doing in this step is deciding which of these screws
will be dedicated to a fertilizer pump (or fertilizer valve) instead of a watering
valve. (If you are using a fertilizer pump, it is typical to use a Pump Start Relay,
such as the Toro SR-1, to connect to the pump. A pump start relay enables the
Evolution AG, which outputs 24v, to start a pump, which operates on 110v.)
Select DEDICATE FERT PUM, then DEDICATE FP1. Scroll up and down to select
the valve terminal you want to be dedicated to FP1.
You will only be able to see and select valves which have not already
been programmed to be a watering valve. If you don’t see any valves, it
probably means all your valves have been programmed to be a watering
valve. In this case, go to the ADVANCED / VALVE DETAILS menu to
check. For more details on this situation, see the Troubleshooting
section of this FAQ.
Repeat the step above for FP2 if you also want to have a second fertilizer pump.
Change language to Spanish
o Select the HELP/SETUP shortcut
o Use the SELECT again to toggle back and forth between English and Spanish
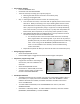
Save/Load a program using a USB
o Program the controller to the settings you
want to save, and insert a USB into the
controller.
o Select the HELP/SETUP shortcut
o Scroll down to SAVE TO USB, and select.
o To load a program saved on a USB, select
the menu item LOAD FROM USB.
Use Multiple Schedules
o The default condition for the controller is to have only one Schedule enabled. When in
this condition, it is simply referred to as SCHEDULE, rather than SCHEDULE A. When
additional Schedules are enabled, this default Schedule is thereafter referred to in
menus as SCHEDULE A.
o To enable additional Schedules, Enter the ADVANCED menu section, and select
SCHEDULE DETAILS.
o Schedule A is enabled by default. To enable additional schedules, select the schedule
(SCHEDULE B, OR SCHEDULE C), and select ENABLE.