
Use and Care Manual


BEFORE FIRST USE
1. Rinse all removable parts in hot, soapy water.
DO NOT
submerge body in any liquids.
Base can be wiped clean with a damp cloth. Please refer to the Cleaning Instructions
for more information.
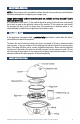
2. Place poaching tray, measuring cup, bowl, lid and egg rack next to the unit.
CAUTION: Piercing pin is on the base of the cup and is extremely sharp.
3. Position the egg tray over the base. The side handles should be facing upward.
4. Place the shell lid over the cooking tray.
5. Plug in the power cord. Your egg cooker is now assembled for use.
HOW TO USE YOUR EGG COOKER
SOFT, MEDIUM AND HARD-BOILED EGGS
1. Place Egg Cooker appliance on a clean, dry
surface.
2. Remove lid and all other removable parts.
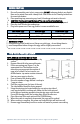
3. Fill the measuring cup (Figure 1) to the
appropriate line. The numbers on the
measuring cup represent the number of
eggs to be cooked. For best results, use
distilled water- tap water contains minerals
that can cause eggs to discolor.
4. Pour cold water into heating plate.
5. Rinse the number of eggs desired- cook up to
7 eggs at a time.
6. Place the egg tray over the base of the unit.
The side handles should be facing upward.
7. Using the piercing pin located under the cup, pierce top side of
each egg and place in cooking rack. Make sure the holes pierced
in the eggs are pointing upwards when placing eggs onto the rack.
Do not let the eggs touch the heating plate. Rinse pin after use.
8. Place lid on top of the unit and push the POWER button.
9. When the water is completely evaporated, the eggs will be cooked.
10. When cooking is complete, the power and indicator light will both turn off.
11. Remove eggs immediately and rinse under cold water to prevent overcooking.
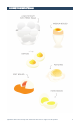
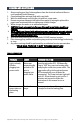
Soft Boiled Eggs
Medium Eggs
Hard-boiled Eggs
1 – 7 Eggs
1 – 7 Eggs
1 – 7 Eggs
6 Minutes
9 Minutes
12 Minutes
NOTES AND TIPS #1
Refrigerate eggs until ready to use. Always use cold eggs – do not bring them to
room temperature before using or the eggs will be slightly overcooked.
Figure 1
Questions? We're here to help! Visit: www.maxi-matic.com for support on this product.
4