Safety Warnings • When operating the machine in the presence of children, pay close attention to their safety. • Do not treat the unit as a toy for children. • Keep your hair, feet, fingers, and clothing away from the unit's garbage collecting mouth. • Do not operate the sweeper barefoot or while wearing open-toed shoes. • Avoid sweeping materials that are hot, burning, or smoking to prevent fire hazards and personal injury. • Do not collect flammable, explosive, or toxic materials.
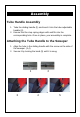
A Assembly Tube Handle Assembly 1. Take the sliding handle (1) and insert it into the tube adjustable handle (2). 2. Ensure that the stop spring aligns with and fits into the corresponding hole. Once in place, your assembly is complete. Attaching the Tube Handle to the Sweeper 1. Align the hole in the sliding handle with the screw on the side of the sweeper. (3,4) 2. Secure it by turning the knob (5) until it is snug.
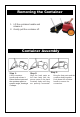
Removing the Container 1. Lift the container handle and release it. 2. Gently pull the container off. Container Assembly Step 1: Step 2: Lift the container handle and release it. Raise the front part and the container part to a specific angle, forming a V shape. Align the hook parts on the front body with the groove parts on the back container body until they are perfectly connected. Step 3: Bring the front parts and the container body together.
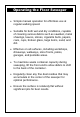
Operating the Floor Sweeper • Simple manual operation for effortless use at regular walking speed. • Suitable for both wet and dry conditions, capable of cleaning various debris such as sawdust, metal shavings, leaves, stones, cigarette butts, papers, cans, cups, broken glass, large items, sand, and dirt. • Effective on all surfaces, including workshops, driveways, walkways, store fronts, patios, garages, and poolside areas.
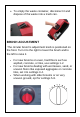
• To empty the waste container, disconnect it and dispose of the waste into a trash can. BRUSH ADJUSTMENT The circular broom's adjustment knob is positioned on the front. Turn it to the right to lower the brush and to the left to raise it. • • • For new brooms on even, hard floors such as asphalt, concrete, or tiles, use settings 1-2. For new brooms dealing with wet leaves, sand, or uneven floors like exposed aggregate or concrete tiles, set it to settings 3-4.
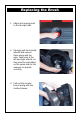
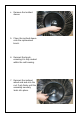
Replacing the Brush 1. Adjust the turning knob to the far-right side. 2. Strongly pull the inclined wheels and remove them along with the axle. Take note of the left and right wheels, as they must be reinstalled on the same side for the sweeper to operate correctly. 3. Pull out the circular broom along with the toothed sleeve.
4. Remove the toothed sleeve. 5. Place the toothed sleeve onto the replacement brush. 6. Reinsert the brush, ensuring it is fully seated within the rod housing. 7. Reinsert the inclined wheel and axle into the rod. Push firmly until the assembly securely locks into place.
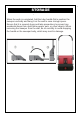
STORAGE When the work is completed, fold the tube handle flat to position the sweeper vertically and hang it on the wall to save storage space. Ensure that it is securely hung and take precautions to prevent any accidental drops that could harm people, pets, or other objects. When removing the sweeper from the wall, do so carefully to avoid dropping the handle or the sweeper body, which may result in damage.
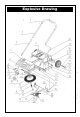
Explosive Drawing