
User Manual
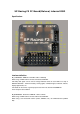


How to install MW OSD firmware to your OSD hardware
Preparation
•Download the MW OSD
software pack of your choice.
•Download the Arduino flavor
that matches your system.
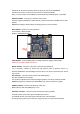
Testing Firmware communication flashing
•Connect the OSD to the FTDI adapter, and that to the PC.
•Start Arduino IDE.
•Choose the appropriate board. For most MinimOSDs etc go to menu Tools > Board > Arduino
Pro or Pro Mini 5V, 16MHz, w/ ATmega328.
•Select the proper serial port in menu Tools > Serial Port.
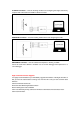
•Click on the "Upload" button and observe the serial console at the bottom of arduino. Success
is noted as white text on black background stating just the binary sketch size. If messages in
red letters appear, something went wrong.
Firmware flashing
•Connect the OSD to the FTDI adapter, and that to the PC.
•Start Arduino IDE.
•Select File > Open. Browse to the MW_OSD folder and select 'MW_OSD.ino'
•A new Arduino IDE will appear. Close the other window as it it no longer needed.
•If you have not already done so, make sure to do the following: From the MW_OSD Arduino
window, choose the appropriate board. For most MinimOSDs etc go to menu Tools > Board >
Arduino Pro or Pro Mini 5V, 16MHz, w/ ATmega328. Select the proper serial port in menu
Tools > Serial Port.
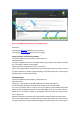
•Edit the config.h tab to select the correct OSD hardware, Flight controller and aircraft type.
•Click on the "Upload" button and observe the serial console at the bottom of arduino. Success
is noted as white text on black background stating just the binary sketch size. If messages in