
Installation Guide


high*spots,*ridges,*or*uneven*areas.*Place*a*lev el*against*the*wall.*If*ther e*is *a*1 / 8” *g ap *o r*g re a te r,*u se *a*f iller *su ch *a s *
spackling*or*drywall*compoun d*to*fill*in*imperfections.*
!
!
Method!2:!An* additional*adhesive*should* be*used,*if*you*do*not*intend*to*p rep are,*san d*an d*prim e *the*su rface .*We *
recomm en d *a*high-quality*polyurethane*construction*adhesive*be*applied*to*the*back*of*each*panel*in*these*cases.*Be*
sure*to*remove*th e*release*film *on*the*ba ck*of*each*panel*b efo re *applying*addition al*adhesive .*Apply*some*small*pea-
sized*dots*of*adhesive*to*the*back*of*a*full*tile*(see*right).*Keep*the*adhesive*a*half-in c h *fro m*the*ed g es .*
*
Layout!
Measure* the* first*area*to* be* covered* by* Real*Thin*Stone*Pan els.*W e*recommend*you*lay* o ut*the* entire*project*on* a*flat*
surface,*like*the*counter*top,*a*table*or*the*floor,*before*adhering*to*the*substrate,*to*be*sure*you*have*enough*Real*Thin*
Stone* Panels*and*your*design*and*layout*is *correct.*T h is*will*also *give*you *good*reference*as*to*how*the *Real* Thin*Stone*
Panels*will*look*on*yo u r*w a ll. *As* each* project*is* different,*be*sure*to* plan* for*cutouts,*corners*or* edge* treatments*before*
applying*Real*Thin*Stone*Panels.*One*popular*layout*method*is*to*begin*from*the* inside*corner*of* your*counter*and*work*
across*left*to*right.*This*meth od *a llo w s *yo u *to *use*two*points*of*reference,*your*vertical*wall*and*horizontal*counter*top.*
!
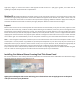
Note!—*when*using*these*two*points*of*reference,*be*sure*to*check*them *for*level*on*the*horizontal*plane*and*90°*on*the*
vertical* plane.**This*will*prevent*any*problems* as*you* build*your*backsplash.*Lay* a *4’*level*on* top*of*your*cou nter*top* or*
backsplash*return*lip*if*you* have*one.*If*the*counter*is*level,*use*it*as*your*reference.*If* not,*ide nt ify*the*high*point(s)*of*
the*counter*to p.*Dra w *a*ho rizon tal*line*using*your*level*and*snap*a*reference*line*to*indicate*the*high*point.*
Snap* a*reference* line*to* indicate*the* top*of*the*first*row*of*tiles.* The*top*edge*of* the*first* row*will* be*installed* along*this*
line.*Use*a *le ve l*or*measuring*tape*to*mark*the*vertical*term ina tion *po int*of*yo ur*insta llation. *
!
Installing!fir st !Natural!Stone!Covering!Real!Thin!Stone!Panel!
Be*sure*the*substrate*is*clean*and*dry.*Remove*the*adhesive*liner*from*the*back*of*the*matted*Real*Thin*Stone*Panel.*Align*
the*panel*wh ere *you *w an t*it*on*th e*refe ren ce*lines .*
!
!
!
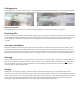
Lightly!place!subsequent!tiles!on!the!wall!using!your!reference!lines.!Do!not!apply!pressure !to!the !pane l!
until!you!are!sure!of!your!placement.!!
!
!
!
!
!
!
!