Acro Naze32 (rev 5) basic guide by Dlearnt ! 20 August 2014! ! ACRO NAZE32 GUIDE - DLEARNT EDITION 4 1
Introduction! I came to this board from a KK (trying a cc3d in between), and wished there was a guide like this to make things a bit easier. This guide is based on my experience, such that it is, and is really for noobs and people uninitiated to the multiwii sect. It’s also for Naze32 virgins unwilling to be sacrificed before its Lord and Master, timecop.! 1. Take your props off! For those with an undeveloped prefrontal cortex.! Flight Controller Mini Fun Fly ! 2.
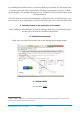
5. Connect your board to the Baseflight app via USB! See step 3 if you are having trouble. Don’t connect your battery just yet.! 6. Flash your firmware! ! 7.
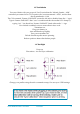
———-! You may wish to change your ‘map’ [Aileron, Elevator, Throttle, Rudder, Aux 1, etc] depending on your receiver setup.! ! If you use a Futaba radio see para. 5 on page 11 of timecop’s manual! ! See mochaboy’s video if you want to know more.! ! Click on the Initial Setup tab! 8. Fix the Naze32 to your quad! And hook your receiver and ESCs up to the board. ! ! ! ! ! For ESCs, only one ESC needs to have its signal, ground and voltage wires connected to the board.
For standard (non-PPM) receivers,1 connect all three wires (ground, 5V, and signal) from Channel 1 from your receiver onto the top left three pins (ground on the left, 5V, then signal on right). Yes, ground is the brown wire. Channels 2-8 only need the signal wires from the receiver.! ! For PPM receivers use the top left three pins on the board only. For PPM receivers, you will also need to type "feature ppm" in the CLI tab, then type "save", then exit the CLI tab.! 9.
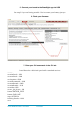
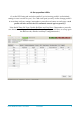
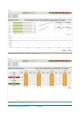
! 12. Set up profiles & PIDs! Go to the PID Tuning tab and select profile 2 (you're leaving profile 1 in the default settings in case it works for you). For a 400 sized quad you may wish to change profile 2 in accordance with my settings (remember to press the save button on each page - each profile will have to have the CLI commands entered again separately): ! ! *Note the RC Rate, RC Expo, Pitch & Roll Rate and Yaw Rate. (Remember to press the save button on each page for each profile.
ACRO NAZE32 GUIDE - DLEARNT EDITION 4 7
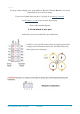
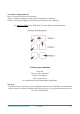
! ! ! Auxilliary Configuration tab: ! Rate = No auto level [no boxes checked]! Angle = limited to 45 degrees with auto level [Angle box checked]! Horizon = beyond 45 degrees but still auto level [Horizon box checked]! ! see Hadriez's PIDs for his ADS 400Q. For mini quads, check the forums.! ! 13. Set up your transmitter! Props off. ! Turn on your transmitter. ! Plug in your battery. ! Leave your USB in. ! Go to the Receiver tab in Baseflight Configurator.
! For a Turnigy 9xR ! ! The sub trims are in the Limits screen. Sub trim sets the channel's centre point. The values can be -100 to 100 with increments of 0.1 You use your sticks to set the centre point by looking at the value on Baseflight Configurator while you are moving your sticks. Use the left hand pads on your radio to select the channel you wish to sub trim, and highlight it by pressing the MENU button.
13. Test failsafe! Test your failsafe with your props off. You’ll notice that the “failsafe_throttle = 1000” command you entered in in CLI is equal to the “set mincommand = 1000”, and less than the set minthrottle = 1100. ! The CLI command “Feature -FAILSAFE” means the fail safe is disabled (note the “-“ sign).! Type in "feature FAILSAFE” then “save” to enable and then do another CLI ‘dump' by typing “set”. You should see "feature FAILSAFE" listed without the “-“ sign.
! This is about the extent of my knowledge. If you need to know more, unfortunately I am not the person to inform you.! ! This guide is really only for Acro Naze32 users, not the full Naze32 board, so I don’t intend to include instructions on enabling the other options like mag. baro. and headless. Check the forums for those.
! 14. Timecop Axioms! ! ! *use this guide at your own risk.