
User Manual


HOW TO USE
Warning:
If it is your first time using this controller, you need read the entire manual carefully before use.
SETTING
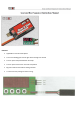
At first, connect the servos without load, connect the JR connector to the receive channel that you have decided on.
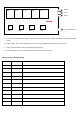
Then power on, the display will show F1 at first, which means the controller is in mode F1.
If you want to change to mode F2 or F3, press FUNC- and FUNC+ both for more than 2 seconds to change.
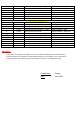
About the meaning of F1, F2, F3, please see Note Table 1.
After your choice of working mode, you need to check the servos' movement under such mode.
Press both VOL- and VOL+ for more than 2 seconds, you see a setting list, each starts with a number.
"o,1,2..... d" –“ o” means that the controller is on the “0”setting, the numbers following the “o” is the current volume.
For details see Note Table 2.
You can adjust the positions and delay time by pressing VOL- or VOL+, the servo will move to the set position in the
real time.
SETTING CHECKING
If you busy setting and you want to check the normal running, you need to press VOL- and VOL+ both for more
than 2 seconds again - this will make it back to up a level to working mode.
Note that whenever you power your Tx/Rx off and then on again, the control signal from the Rx is active but the Gear
and Door Sequencer Controller outputs to the servos are disabled.
This is a safety feature, in order to protect your model and you from the accidental movement of the doors and
landing gear on power up.
To arm the system, you need to toggle the control channel switch on your Tx back and forth three times quickly.
The retract controller is now armed (if your control channel has a three position switch please set it at zero).
If the switch is at the ON position, you will see the servos start running the first half cycle of your choice of working
mode.
If the switch is at the OFF position, you will see the servos start running the last half cycle of your choice working
mode.
At this time, you may find there are still some settings that need adjustment.
You can press VOL- and VOL+ both more than 2 seconds to enter setting mode again.
RUNNING
After you have successfully tested the Gear and Door Sequencer Controller without load, you can install the system in
your model.
Please remember to test again after the installation and adjust the running if needed.
There have two things you need to remember:
o After powering the Gear and Door Sequencer Controller off, the controller needs to be armed again. Toggle
the control channel switch on your Tx back and forth three times quickly to arm (if your control channel has a
three position switch please set it at zero after arming)
o 2) You need to put the controller back into working mode (press VOL- and VOL+ both more than 2 seconds)
RESETTING BACK TO FACTORY DEFAULT SETTING
Sometime you may want to set the Gear and Door Sequencer Controller back to the factory default setting.
This is the way to do it from the working mode:
o Press both the VOL- and VOL+ for both more than 2 seconds to go into the programming mode
o Then press both the FUNC- and the FUNC+ for more than 2 seconds, the displays will flash and all data is set
back to factory default setting.