
Instructions / Assembly


Page 7 of 11 Revised: 2016-05-17
3.6 Piping Connections
Do not put excessive stress on the tank or fittings during the installation. Bending of the pipe
beyond 15° during assembly or putting excessive stress or distortion on the transition fitting is not
allowed.
Caution! The compression nuts are factory installed to the required minimum torque of 30 ft-lb (40 N-m)
to prevent leakage and shall not be removed. The 30 ft-lb (40 N-m) torque value represents good hand
tightening. If the compression nuts are to be removed, please ensure that they are tightened to the
torque value indicated above before completing the installation. NOTE: THE TRANSITION FITTING IS
MADE LEAK-TIGHT BY COMPRESSING THE RUBBER GASKET AGAINST THE TANK WITH THE
ALUMINUM COMPRESSION NUT.
Care should be taken to ensure that fill and vent pipes are properly aligned (plumbed and perpendicular
to the top the tank). Proper pipe alignment will ensure that gaskets are evenly compressed, properly
seated and sealed. The tank will not tolerate the torque of a misaligned pipe.
For indoor tanks, piping shall be secured or supported by fire-resistant hangers to prevent stresses or
loading on the tank and fittings. The tank is not designed to support the weight of the piping. The vent
and fill pipes shall be inspected for blockage and shall be terminated outside the building with a rain cap.
All threaded pipes shall be connected using a metal transition fitting and only the oil-level gauge is to be
installed using a plastic transition fitting. NOTE: PIPE SEALANT OR TEFLON TAPE ARE NOT
REQUIRED ON PLASTIC FITTINGS TO ENSURE PROPER CONNECTION AND ARE NOT ALLOWED
FOR TANK INSTALLATION.
Abuse (such as, bending, over-tightening, use of power tools, etc.) of threaded plastic fittings is
not considered normal installation practice and is not covered by the tank warranty.
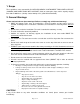
Suggested connection diagram