
Instructions / Assembly


[Type here]
5
avoid breathing the fine dust created while cutting and wear masks. If a wet-tile cutter is not used, spray the area
well with water before cutting to reduce airborne dust. Before to dry the tiles before installing.
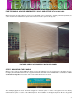
If a panel needs to be cut, the cut edge should be one that ends against a wall, ceiling or floor as there will be no
pattern flow from a cut edge to the next panel.
Please note that continuous pattern flow is only between original factory edge to factory edge. Any edge that has
been cut will not have pattern flow. Cut edges must be installed so they face the floor base board & ceiling or side
walls.
FILLING IN THE SEAMS AND SANDING
Allow the panel adhesive mortar to dry for 24 hours and then apply the joint compound to the seams. To attain a
"seamless" look a filler needs to be applied between the seams, allowed to dry and then sanded. The compound
should be feathered 1” on each side of the joints like it’s done with sheet rock and allowed to set before sanding
begins.
A dry-mix joint compound, SHEETROCK BRAND EASY SAND 45 and THORO ACRYL 60 ACRYLIC
FORTIFIER available at Home Depot or Sears.
The filler compounds should be mixed as follows:
1. Premix one part ACRYLIC FORTIFIER to three parts of water.
2. Add 10oz of the liquid mixture above to one pound of SHEETROCK EASY SAND.
3. Mix well and until it reaches the consistency of pre-mixed joint compounds.
The first application of the filler on the seams can be removed with a wet microfiber towel. If a second application
is needed it can also be removed with the wet towel. Do not use a wet sponge because the gypsum should not be
soaked. Before applying the final application of filler that will be sanded the area should be dry.
After application, the filler should be allowed to dry for about two to five hours and then start sanding. Sanding
should be done first with 150 grit, follow up with 220 grit and finally a 320 for finishing. When sanding with the 150
grit, be sure to do so with a light pressure so as not to create scratches or fizzures on the gypsum.
If for any reason the filler shows line cracks or fissures after sanding, this could be due to adverse weather
conditions like hot or cold while the filler is setting. If that happens you can either add more filler, then let it dry and
sand. Sanding should be done following the direction of the pattern in much the same way that a stain is applied
following the direction of the wood grain. The filler should extend at least 1" on each side of the joint and sanded
smooth to the touch. Run your fingers through the sanded area to detect imperfections that are not visible and
use a high-density light to show off imperfections. Please make sure to follow the instructions below to seal the
seams and the panel. To test for smoothness, light the area with a bright light to make sure the seams are smooth
and there are no imperfections not visible to the eye. Avoid buildup of filler on the screw holes and only feather or
spread the filler beyond the joints. Sloppy application of the filler will require extra labor time to sand down as well
as the likelihood of bumps and imperfections.