
Instructions / Assembly


[Type here]
3
***IF THE PATTERN FLOW DOES NOT MATCH, STOP AND CONTACT TEXTURES-3D®
FOR TECHNICAL ADVICE. IMMEDIATELY CALL OUR OFFICE AT 818-346-3480.
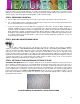
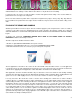
When the panels properly aligned, once they are filled with on the seams/joints, sanded, primed and painted, the
seam should not be visible like the picture below that shows three panels side by side:
PICTURE SAMPLE OF PROPERLY INSTALLED PANEL
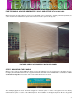
STEP 7. MOUNTING THE PANELS
When you are ready to start installing the panels, inspect the wall they are to be mounted on. If the wall is uneven,
it is highly recommended that a 3/8” to ½” plywood sheet be mounted on the wall first with a combination of thin-
set mortar for large tile and counter-sunk screws firmly attached to the studs.
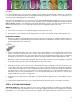
The underlying plywood sheets should be staggered so that the joints or seams of the plywood are not directly
underneath the joints or seams of the 3D wall panels. The installation of thin plywood panels will not only permit