
Instructions / Assembly


[Type here]
2
STEP 3. STORING THE PANELS
Panels should be stored vertically until they are ready to be installed. Panels should not be stored flat to prevent
warpage nor should they be tilted at an angle. If they are propped up vertically against a wall, make sure to plant
a heavy object to prevent the panel from falling which could result in breakage.
STEP 4. PREPARING TO INSTALL
a. Tiles should be removed from their boxes and the cartons may be taped and used to protect the floor.
b. It is recommended that before starting the installation that four panels be removed and positioned flat on the
floor to understand and see how the pattern flows.
c. Using a laser guide projected on the wall draw a straight line on the wall so the panels will be straight when
installed. Installation must be square, level and plumb. The difference between level and plumb lies in
orientation. When something is “level” it’s straight from side to side, like a shelf that is properly installed.
When something is “plumb”, it’s straight up and down, like the walls of a building. Square means corners are
90 degrees. Level is always gauged by a device, such as the laser guide or carpenter’s level. Note that “level”
is not always parallel to the ground. Plumb is vertical, most accurately gauged by a plumb bob. Levels can
show when posts are plumb.
STEP 5. DRILLING COUNTERSUNK HOLES
Unlike ceramic tiles that are only glued to the wall, the continuous flow seamless installation
requires a combination of PRE-MIXED DRYWALL COMPOUND + GLUE + COUNTERSUNK SCREWS. The tiles
cannot be installed solely with compound. Using a countersink drill bit drill four holes near the four corners in the
flatest areas of the 3D surface. While it might seem logical to install without screws, this an important safety
feature. Each tile averages a weight of over 10lbs. If a tile is poorly glued to the wall there’s a chance that one
might fall on someone’s head as well as the possibility that a slight movement will change the alignment and loss
of pattern flow. Further, the screws bind the panel tighly against the wall so in the event of any movement,
shaking or vibration they will maintain the integrity of the seams.
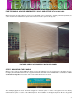
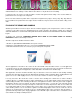
STEP 6. SETTING UP THE CONTINUOUS PATTERN TO FLOW
TEXTURES-3D® ARPOLE Panels are computer designed to have the pattern flowing from one panel to the next.
Before starting to install the panels, it is recommended that four panels be first lined up on the floor in two rows of
two so the installer can understand how the pattern flows. The installer should study and plan how the panels
need to aligned so the pattern flows smoothly and continuous. The flowing lines of the pattern of the preceding
panel should look like a continuation on the next panel. If the panel to be installed does not properly align with the
panel next to it that you must STOP and DO NOT INSTALL until the problem is resolved which usually is caused
by the improper installation of the first panels. For questions call us at 818-346-3480. Below is a sample of what a
failed pattern flow looks like:
PICTURE SAMPLE OF IMPROPERLY INSTALLED PATTERN