
Iron Baluster Instructions

35280 Scio-Bowerston Road • Bowerston, OH 44695
740-269-2221 • (Fax) 740-269-9047
www.ljsmith.net • ljsmith@ljsmith.net
Form Number: LJ-1104 IRONINST
Step 4 — Secure The Balusters To The Treads:
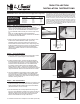
1. Fill the drilled tread holes half full with our two-part epoxy
adhesive (LI-3701, LI-3704 or LI-3705). When using
two-part epoxy, be aware of cure times. Construction
adhesive may also be used. (Photo 4a)
2. With a bottom base on each baluster, place all balusters
in position on the treads. Fill any void around the bottom
of the balusters with our two-part epoxy or construction
adhesive. Rotate each baluster slightly to even the
adhesive coverage. Use a combination square to straighten
each baluster. (Photo 4b)
3. Secure every 6th baluster with a trim screw. (Photo 4c)
Step 5 — Secure The Balusters To The Handrail:
1. If top baluster collars are being used, place one on each
baluster. (Photo 5a) (Note: The angle of the rake top
baluster collars can be adjusted to the proper angle by
using a hand held grinder or by clamping each collar on a
chop saw and cutting the proper angle.)
2. Fill the holes in the handrail half full with construction
adhesive. (Photo 5b) Note: masking tape may be applied
over the holes if the construction adhesive has a runny
consistency.
3. Position the handrail on top of the balusters and
permanently secure the handrail to the newel posts. If
masking tape was used over the holes in the handrail, the
balusters will push through the tape when the handrail is
installed. Then, remove the remainder of the tape on the
bottom of the handrail. (Photo 5c)
4. Secure every 6th baluster to the handrail with a trim screw.
(Photo 5d)
1. Any protruding epoxy or adhesive should be left to dry
(about 24 hours) and can then be removed with a utility
knife.
2. For collars with a set screw, use an allen wrench to secure
each top collar against the handrail and each bottom collar
against the tread. (Photo 6a)
© 2013 L.J. Smith, Inc.
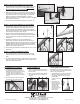
Installing Medallions
1. Open the medallion by twisting the two
halves in opposite directions to separate
the two halves.
2. Screw the halves together tightly against
the round opening of our medallion iron
balusters.
Installing Adjustable Knuckles
Our Adjustable Knuckles are typically used on
our LI-PLA44 and LIH-HOLPLA44 balusters to
create a unique baluster design.
1. After installing the balusters into the tread,
but before placing the handrail on top of
the balusters, slide the desired number
of Adjustable
Knuckles over each
baluster.
2. After placing the
handrail on top of
the balusters, slide
each adjustable
knuckle to the
desired location
and tighten the set
screw using an
allen wrench.
Photo 4a
Photo 4b
Photo 4c
Photo 5a
Photo 5b
Photo 5c Photo 5d
Photo 6a
LI-40840 Baluster Hardware
1. Place the hardware bracket around
the baluster and position it where the
baluster meets the wood handrail. Using
the screw holes in the bracket as a
template, mark and predrill two holes
into the handrail to accept the hardware
screws.
2. Permanently secure the bracket to the
handrail using the included screws.