
Instructions
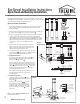

Box Newel Installation Instructions
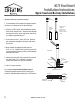
Kneewall Installation
Kneewall Installation
1. Mark the balustrade centerline on the kneewall.
2. Cut the newel to length.
3. Make a mounting block from 3/4" plywood or 2" x 4" to fit between
the corner bracing on the inside of the bottom of the box newel. Glue
the block inside of the newel to the back panel.
4. Mark and drill two 1" diameter holes in the front panel of the newel.
5. Mark and drill two 3/8" diameter clearance holes in the back panel
through the mounting block. These holes should be directly opposite
the 1" holes in the newel face.
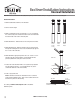
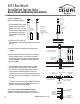
6. Mark and drill the appropriate pilot hole for a 1/4" or 5/16" x 3-1/2"
lag bolt in the end of the kneewall to correspond with the holes
previously drilled in the back panel of the box newel.
7. Position the newel and attach with 3 1/2" lag bolts (longer lag bolts
may be required if using a 2" x 4" mounting block). Use glue or
construction adhesive on the final assembly.
8. Install 1” plugs and sand.
Note: A solid block could also be attached to the floor so that the
newel could be slid down over it. Then screws could be run thru the
bottom of the panels into the blocking.
See catalog or www.creativestairparts.com for installation
hardware options.
Side View
Back Panel
3-1/2"
Lag Bolts
3-1/2"
Lag Bolts
Kneewall
Top View
1" Wood
Plugs
1" Wood
Plugs
Mounting Block
Mounting BlockKneewall
Balustrade
Centerline
IMPORTANT: Please read all instructions thoroughly before beginning. For final installation, always use an approved adhesive at every assembly joint.
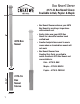
4091
P-4191
P-4291
P-4391
F-4191
F-4291
F-4391
R-4191
R-4291
R-4391
NOTE: For interior use only
3