
Instructions
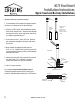

Box Newel Installation Instructions
Open Tread and Balcony Installation
The following instructions are designed to be used for the installation of box newels using
the 4091MB Box Newel Mounting Block. These instructions assume the location of each box
newel has already been marked on the stairway and balcony.
Open Tread and Balcony Installation
1. Trim the bottom of the newel to the proper length. If necessary, cut and notch the
newel over the side of the balcony (see step 5.1) and if notching over the tread
and riser, see step 5.2.
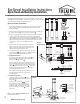
2. Temporarily fit the mounting block from the inside bottom of the box newel. Make sure
the countersunk hole end (top) of the block enters the newel first (
D
).
3. Remove the mounting block from inside the newel. Coat the bottom of the block with
construction adhesive and center it at the box newel location on the balustrade
centerline (
C
). Be sure the countersunk hole end is facing up (
H
). Place a washer in
each hole and secure the block to the floor using the provided screws. (If the newel is
notched to fit over the edge of a balcony, only 2 washers and screws can be used to
secure the block to the floor.) Proceed to Step 5 if the newel
is notched.
4. Coat the complete outer surface of the block with construction
adhesive. Set the newel over the mounting block and secure the
newel to the block using 4 small screws. Conceal all holes and
hardware using plugs or putty and sand to finish.
5. For notched newels, fill the void in the notched portion of the newel
with a wood block (
B
F
). Glue the block to the inside of the newel.
Coat the exposed wood block with construction adhesive.
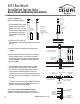
5.1 Landing Newel Installation:
Notch landing tread and skirt board for width of newel (
A
). Then
notch the newel (
B
). Be sure that the newel will align with the
balustrade centerline after notching (
C
).
Coat the mounting block with construction adhesive. Set the newel
over the mounting block and secure the newel to the block using
screws (
D
). Secure the newel to the face of the balcony by using
lag bolts installed through the face of the newel (
C
). Screws may
also be installed through the sides into the face of the plywood
spacer block. Plug and sand all holes.
To conceal any end grain, apply a wood cap over the bottom of
the newel that protrudes past the face of the balcony or
intermediate landing.
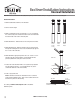
5.2 Starting Newel Installation:
If notching over edge of tread and riser (
E
), be sure
that the newel will align with the balustrade centerline
after notching (
G
).
Use wood spacers to fill the void (
F
G
). Test fit the
spacers and newel, then glue and clamp the wood
spacers to the insides of the newel and allow to dry.
Use lag bolts to fasten the newel to the stair through
the spacers and into the stair stringer (
F
). Plug and
sand all holes.
Note: See catalog or www.creativestairparts.com for
installation hardware options.
4091MB
Mounting Block
Wood Spacer
Block to fill void
Lag Bolts
Screws
Wood cap on
bottom of newel
4091MB
Mounting Block
Balustrade
Centerline
Screw on both sides
(optional method)
Lag Bolts
(best method)
Lag Bolts
into Stair Stringer
Lag Bolts
into Stair Stringer
Balustrade
Centerline
Wood
Spacer Block
Top View Box Newel
Open Tread Installation
Notched Starting Newel
and Tread
Top View Box Newel
Landing Installation
Wood Spacer
Block to fill void
Wood Spacer
Block to fill void
Screw
Washer
4091MB
Mounting Block
IMPORTANT: Please read all instructions thoroughly before beginning. For final installation, always use an approved adhesive at every assembly joint.
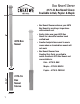
4091
P-4191
P-4291
P-4391
F-4191
F-4291
F-4391
R-4191
R-4291
R-4391
4091MB
Mounting Block
Side View 4091MB
Mounting Block
Installation
Box Newel
Landing Installation
4091MB
Mounting Block
Wood Spacer
Block to fill void
Lag Bolts
Screws
Wood cap on
bottom of newel
4091MB
Mounting Block
Balustrade
Centerline
Screw on both sides
(optional method)
Lag Bolts
(best method)
Lag Bolts
into Stair Stringer
Lag Bolts
into Stair Stringer
Balustrade
Centerline
Wood
Spacer Block
Top View Box Newel
Open Tread Installation
Notched Starting Newel
and Tread
Top View Box Newel
Landing Installation
Wood Spacer
Block to fill void
Wood Spacer
Block to fill void
Starting Newel
Installation
A
B
C
D
E
F
G
H
NOTE: For interior use only
2