
Instructions / Assembly

DiscountRamps.com • 1-888-651-3431
Page 4Rev. 121719
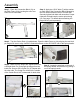
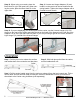
Step 6. Pull the spring handle away from the carrier. Rest the Main Frame on the carrier. Line up
the hinges with the hole in the Main Frame. Slowly release the spring handle into its original position
(through Main Frame). Pull just the spring toward the handle until you see another small hole in the
spring handle. Insert the small pin you pulled from Step 5 in this hole. This creates tension that keeps
the spring handle working properly.
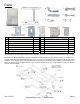
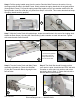
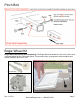
Step 7. With the Carrier Deck still upside down, locate the small holes in the end of the loading deck.
Attach the Deck Stops (14) using the 10mm Bolts (9) with a washer on each side and nut. Tighten
with wrench and/or socket wrench.
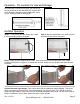
Step 8. Turn the Carrier Deck and Main Frame
assembly right-side-up. Place the Hitch Bar
(3) into the Connection Block, aligning the two
sets of holes.
Step 9. The Hitch Bar should t snugly so that
your carrier is quiet. Install the last 15/16" bolt with
a washer on each side, lock washer, and nut as
previously done in Step 2. Tighten the bolt with a
wrench and/or socket wrench.
C
*The Deck Stop prevents
the loading deck from
being extended too far
from the carrier deck.
D
E E
(6a)
(7a)
(8) (9)
(7b) (7c)
(7d)
(6b)