
Installation Instructions
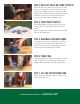

Drill out the three holes drawn on the pot. Be sure to clamp
the pot to your work surface and wear protective eyewear.
Tip: for the best drilling results, place your bit tip at a 90
degree angle moving the tool in and out until you fully break
through the terra cotta. If you want to make the circles
larger, use a saw-like motion to expand the circles.
Step 3: Drill out holes on terra cotta pot
To assemble your bird feeder, you will want to set your pot
on the larger saucer and then lay the smaller saucer on
top of the pot. Secure the eyebolt through the holes in the
saucers at the bottom using a washer and bolt.
Step 5: assemble your bird feeder
Before painting your pot, wrap the top lip of the pot with
painter’s tape. Then, spray paint the pot and saucers if
desired.
Optional: To personalize your bird feeder, draw out a design
using the 107 engraving bit.
Step 4: Spray paint your pot
To hang your bird feeder, tie twine to the ring of the eyebolt.
Tip: to secure knot, we recomend using a glue gun and
adding a dab of hot glue where the knot is tied together.
Step 6: twine time
Using a Seed Scoop, pour bird food into one of the holes on
the pot, lling your feeder.
Step 7: fill the pot with bird food
FOR MORE EASY HOW TO PROJECTS, VISIT M ENARDS.COM
®