
Instructions / Assembly

IOM-ST-DIY-MAT 1515 6 of 96
It is important to select the proper size mat for the given area. Mats cannot be cut shorter
in order to fit a given area. Doing so will damage the heating wire and prevent the system
from working.
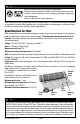
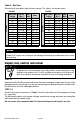
120 VAC
2.5 ft Wide
Mat Square
Footage
Mat Size
(W x L)
Amp
Draw
Ohms
10 2.5' x 4' 1 107 - 132
15 2.5' x 6' 1.5 71 - 88
20 2.5' x 8' 2 53 - 66
25 2.5' x 10' 2.5 42 - 52
30 2.5' x 12' 3 34 - 42
35 2.5' x 14' 3.5 29 - 37
40 2.5' x 16' 4 25 - 32
45 2.5' x 18' 4.5 22 - 28
50 2.5' x 20' 5 20 - 26
60 2.5' x 24' 6 17 - 21
70 2.5' x 28' 7 14 - 19
80 2.5' x 32' 8 12 - 16
240 VAC
2.5 ft Wide
Mat Square
Footage
Mat Size
(W x L)
Amp
Draw
Ohms
20 2.5' x 8' 1 218 - 268
30 2.5' x 12' 1.5 144 - 177
40 2.5' x 16' 2 107 - 132
50 2.5' x 20' 2.5 85 - 105
60 2.5' x 24' 3 68 - 84
70 2.5' x 28' 3.5 59 - 74
80 2.5' x 32' 4 51 - 63
90 2.5' x 36' 4.5 45 - 56
100 2.5' x 40' 5 41 - 51
120 2.5' x 48' 6 34 - 42
140 2.5' x 56' 7 29 - 37
160 2.5' x 64' 8 25 - 31
Please check the product label for exact ratings. This table is for reference only.
Table 2 - Mat Sizes
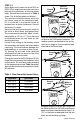
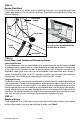
Inspect mat, control, and sensor
To prevent the risk of personal injury and/or death, make sure power is not
applied to the product until it is fully installed and ready for final testing. All
work must be done with power turned off to the circuit being worked on.
STEP 1.1
Remove the Mat, SunStat control, and sensor from their packages. Inspect them for any visible
damage and verify everything is the correct size and type according to the plan and the order.
Do not attempt to install a damaged product.
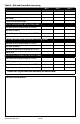
STEP 1.2
Record the product information in Table 4. Give this information to the homeowner to keep
in a safe place.
The Mat model number, serial number, voltage, and resistance range are shown on a nameplate
label attached to the power leads.
Do not remove this nameplate label. The electrical inspector will need to see this.