Linear Drain Installation Instructions Shower Grate Shop OFFICE: (800)746-9885 FAX: (800)746-6088 www.showergrateshop.com info@showergrateshop.
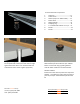
Linear shower Drain components: 1. 2. 3. 4. 5. 6. 7. 8. 9. Bring pipe through your flooring to desired position. Can be positioned so that your linear drain lies tight against the wall or take 1 to 2” off of the back and side walls for easier access to grate top (shown) Grate top…………..……………………………. x 1 Lower trench………..…………………………..x1 Gasket (only on 2” width model) …..…x1 Debris decal...……………………………………x1 Height adjuster….………………………….….x1 Clamping ring …………………………………...
Create a pre-slope to guide water to the outlet. The idea is to create a slope from the outside perimeter of the shower pan to the drain allowing any moisture caught in the liner to flow unrestricted out through the weep holes of the install kit. Line the pre-slope with a waterproof membrane, cross (X) cut holes for the three screws of the install kit and clamp the top half of the install kit over the waterproof membrane.
Lay tiles flush with linear drain and silicone. Finish tiling en-suite and install all necessary fixtures For an invisible look, lay tiles slightly above the linear drain. Using a clear silicone a run a bead around all four edges. Shower Grate Shop OFFICE: (800)746-9885 FAX: (800)746-6088 www.showergrateshop.com info@showergrateshop.
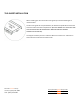
TILE-INSERT INSTALLATION When installing your tile into the tile-insert grate top a silicone based agent is recommended. The tile-insert grate has a top and bottom, the bottom has perforations on the feet and is the wider of the two compartments. (DO NOT ADHERE TILE TO THE BOTTOM AS WATER FLOW WILL BE SIGNIFICANTLY REDUCED AND MAY EVEN BE COMPLETELY RESTRICTED). The top part is where your tile is meant to adhere too and has a ¼” clearance on each side and its ends from the lower trench.