
Installation Guide


Shower Grate Shop
www.showergrateshop.com
info@showergrateshop.com
OFFICE: (800)746-9885
FAX: (800)746-6088
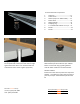
Linear shower Drain components:
1. Grate top…………..……………………………. x 1
2. Lower trench………..…………………………..x1
3. Gasket (only on 2” width model) …..…x1
4. Debris decal...……………………………………x1
5. Height adjuster….………………………….….x1
6. Clamping ring …………………………………...x1
7. 2” install kit with reducer to 1-1/2” ....x1
8. Screws...…………………………………………….x3
9. Screws...…………………………………………….x2
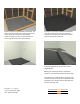
Bring pipe through your flooring to desired position.
Can be positioned so that your linear drain lies tight
against the wall or take 1 to 2” off of the back and
side walls for easier access to grate top (shown)
Concrete (shown):
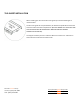
Attach bottom part of install kit to your subfloor.
Recess out concrete using a grinding wheel in
order for lower install kit to sit flush with floor.
Wooden Subfloor:
Install a wire mesh and a slip sheet over top of the
subfloor. This allows for “grab” when you start to
pour the pre-slope. Attach bottom part of install
kit