
Use and Care Guide


Installation Instructions T & G Prefinished Engineered Plank
50 Year Residential Warranty
7 Rev.1RH-16HC
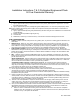
● Tap the boards together with a a hammer and a tapping block. Be sure that the tapping block is against the
tongue only and use only a gentle tapping motion to tap the boards together. Excessive force will damage the
board making it difficult to install additional boards. Do not tap on the groove side of the boards as this will cause
damage to the boards. Once the board has been tapped into place check for a tight fit on sides and ends.
● To install the rest of the flooring, continue placing the boards from left to right, plank by plank, and row by row.
Note: When installing around fixed objects, small areas or even in general installation areas, the use of installation
straps may
prove helpful for securing boards together. Installation straps are a handy tool that will insure a tight fit when used to
strap each continuous row of installation.
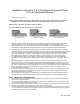
Step 4: INSTALLING THE LAST ROW
Most often the entire length of the last row will need to be cut so that it is narrow enough to fit the remaining space.
When this occurs, follow this simple procedure:
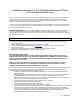
● Lay a row of boards, unglued, with the tongue toward the wall, directly on top of the last row installed.
● Take a full width scrap piece of the product that is being installed with the face down and the tongue side against
the wall. Use 3/8” or 1/2” spacers against the wall to ensure the proper expansion space.
● Draw a line along the row moving down the wall. The resulting line gives the proper width for the last row which,
when cut, can then be wedged into place using the pull bar.
Note: Floor should remain free of foot traffic for a minimum of 12 hours while adhesive sets.
Step 5: FINISHING THE FLOOR
● A drying time of 24 hours is recommended before any damp mopping, cleaning or heavy objects or furniture can
be put back into place.
● The use of putty or a non-silicone based filler to cover small cracks should be considered normal in hardwood
flooring installations. Test filler on spare pieces first to ensure it blends with the floor.
● Make sure when the installation is complete that the expansion spacers are removed and the expansion space is
covered with the appropriate molding such as baseboard and 1/4 round or shoe molding. Do not nail moldings
into the floor but nail into the wall.
● Vacuum the floor thoroughly using the soft brush attachment or dust mop to remove any dirt and debris.
● Use a quality Hardwood Flooring cleaner to finish the floor. We recommend Bona Swedish Formula Hardwood
Cleaner
● If the floor is to be covered, do not use plastic use a breathable wrap, or material such as cardboard or kraft
paper to protect the finish.
● Final inspection by the end user should be conducted from a standing position.
STAPLE DOWN INSTALLATION METHOD
REQUIRED TOOLS AND ACCESSORIES
*
Manual or Pneumatic Fastening Machines with 15-18 gauge 3/16” Crown Staples 1 1/4”-1 1/2” length
* Moisture Meter (wood & concrete)
* Circular or Hand Saw
* Miter or Table Saw
* Drill with 1/16” bit
* Broom
* 15 lb. Asphalt Saturated Felt (not rosin paper)
* Tape Measure
* Mallet (light colored)
* Pry Bar
* Chalk Line and Chalk
* Hammer
* Safety Equipment (Goggles & Mask)
* Utility Knife
* Nail Punch