
Installation Guide

20
Installation Practices
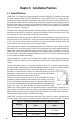
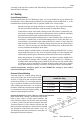
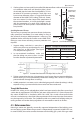
Step 4 Place retainer ring on HOME-FLEX® tubing
Pulling with two pliers, stretch the brass
retainer ring open so that it can be eas-
ily placed in the rst valley of the tubing
(inset). Being careful to not dent the tub-
ing, clamp the ring in place by applying
gentle pressure 360° around the ring. It
should t tightly and not easily spin around
the tubing.
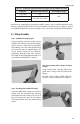
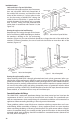
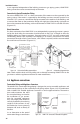
Step 5 Install HOME-FLEX® tting in destination
(manifold, pipe system, xed appliance, etc.)
Make sure that the non-metallic gasket
inside the HOME-FLEX® tting is secure
on the socket. Apply a pipe sealant to the
tapered (NPT) thread of the tting and
install it in the gas system.
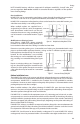
Step 6 Attach ange nut to the installed HOME-FLEX®
tting
Place the HOME-FLEX® ange nut onto the
installed tting. Hand tighten the tting
assembly from the nut-end, then tighten to
the recommended torque value of 62 lbft.
DO NOT use sealant on the parallel thread
of the socket.
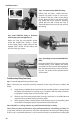
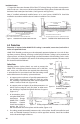
Troubleshooting Fitting Connections
Step 1 Gradually tighten tting until leak stops.
Step 2 If leak does not stop after reaching maximum torque, stop and open assembly and
check:
a) Proper tting assembly. Make sure that the non-metallic gasket is secured inside
the tting and that the brass retainer ring is installed in the rst valley of the tub-
ing. Repeat assembly steps and test for leaks again.
b) Check for any obstructing material (dirt, shavings, jacket, etc.) in assembly. Remove
material and reassemble, checking for leaks again.
c) Check integrity of the assembly pieces. If the retainer ring or non-metallic gasket
are cracked or damaged, replace, reassemble and check for leaks.
Note: DO NOT use sealing solution on parallel thread of tting assembly.
Note: The o-ring does not function as a gas sealing mechanism in the tting assembly. The
o-ring keeps moisture and corrosives out of the area between the tubing and tting ange.
If the o-ring is misplaced and there is risk of outside moisture or contaminants entering the